
Preventing water damage in mountain homes takes a coordinated routine, not a single repair. Keep the home at 55°F or higher while you’re away in cold weather, slope the ground 5-10% away from the foundation, and direct downspouts 6 to 10 feet from the house. Regularly inspect plumbing, HVAC drains, roof drainage, exterior seals, and damp areas so you can address moisture before it reaches structural materials.
Mountain weather can put several parts of a home under pressure at once. In communities such as Evergreen, Breckenridge, and Boulder, freezing temperatures, snowmelt, and rain can expose weaknesses in gutters, joints, and foundation drainage. A small leak or blocked drain can become a larger problem if water is not found and dried promptly.
This guide explains how to inspect drainage and HVAC systems, spot and respond to leaks, maintain exterior seals, and dry moisture-prone areas. You’ll also learn what to check around the foundation and how the home’s exterior envelope helps manage water. These steps for preventing water damage in mountain homes can help you catch problems early and make informed decisions about protecting your property.
Key Takeaways
- Inspect exposed plumbing for early signs of wear, and know which shutoff valves can isolate a leak.
- Trace water around windows, doors, roofs, and plumbing to find where it enters before repairing visible damage.
- Check flashings, sealants, vents, and expansion joints as connected parts of the home’s exterior water-control system.
- Remove standing water and damp materials promptly, then address moisture that may remain hidden in walls and floors.
- Look for drainage patterns that direct water toward the foundation, and correct low spots that allow moisture to collect.
1. Inspecting and maintaining HVAC systems and drainage
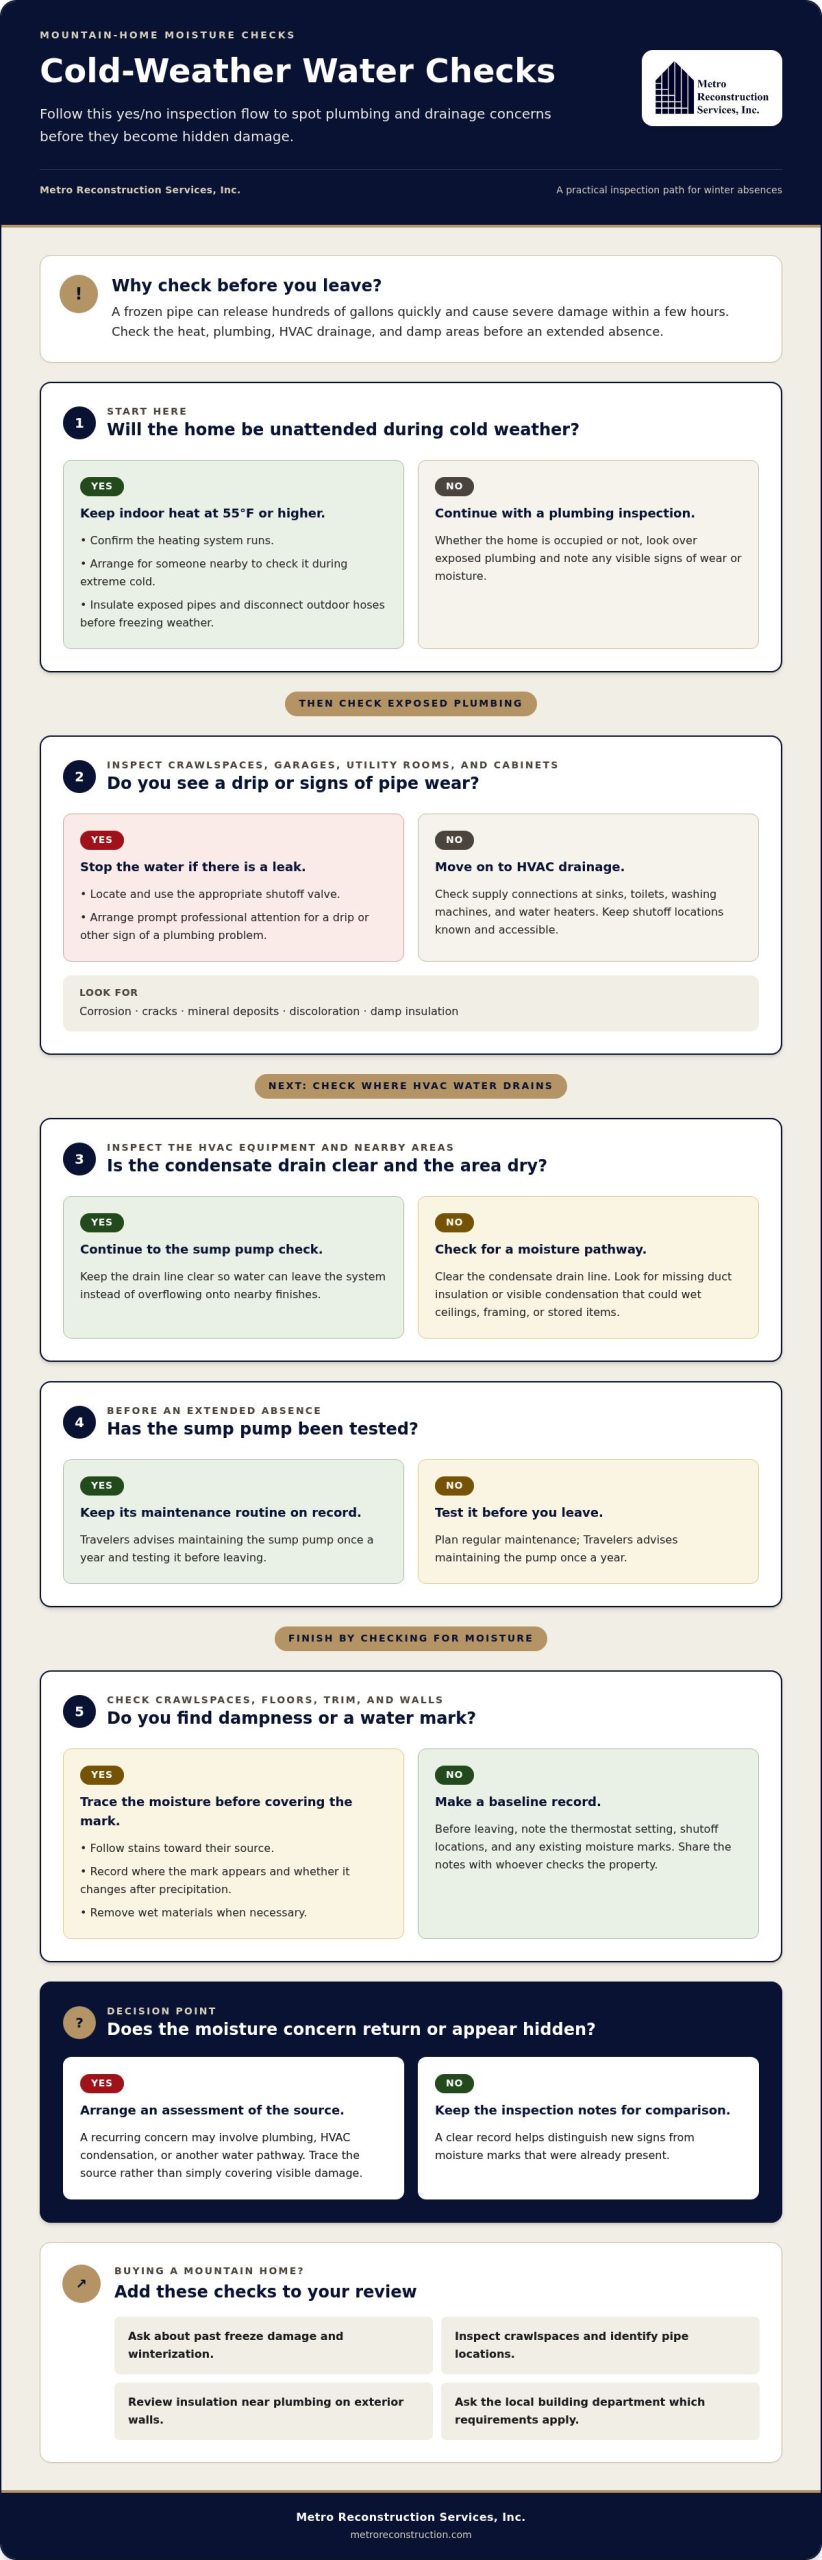
Preventing water damage in mountain homes starts with a cold-weather inspection before you leave. Keep the thermostat at 55°F or higher while you’re away, which helps protect areas containing water pipes from freezing. Confirm the heating system runs, and arrange for someone nearby to check it during extreme cold. A frozen pipe can release hundreds of gallons quickly, causing severe damage within a few hours.
Inspect exposed plumbing in crawlspaces, garages, utility rooms, and cabinets. Look for corrosion, cracks, mineral deposits, discoloration, and damp insulation. Check supply connections at sinks, toilets, washing machines, and water heaters. Locate and label the main shutoff and fixture shutoffs so you can stop water quickly. If you find a drip or other sign of a plumbing problem, arrange prompt professional attention.
Check HVAC equipment for moisture pathways. Keep condensate drain lines clear so water leaves the system instead of overflowing onto nearby finishes. Look for missing duct insulation or visible condensation, which can wet ceilings, framing, or stored items. Test the sump pump before an extended absence. Travelers advises maintaining it once a year and testing it before leaving.
When buying a mountain home, ask about past freeze damage and winterization. Inspect crawlspaces, identify pipe locations, and review insulation near plumbing on exterior walls. Look for water stains, swollen trim, peeling paint, musty odors, and soft flooring. Trace stains toward their source rather than covering them, and remove wet materials when necessary.
Building-code requirements vary by jurisdiction and adopted provisions. Ask the local building department which requirements apply to the property. During your review, also note freeze exposure, blocked drainage, HVAC condensation, and sewer or drain backups. Identifying the source helps determine the appropriate repair.
Before leaving, record the thermostat setting, shutoff locations, and any existing moisture marks. Share these details with whoever checks the property so new signs can be distinguished from conditions already documented.
To reduce frozen-pipe risk, maintain indoor heat at 55°F or higher while away, insulate exposed pipes, and disconnect outdoor hoses before freezing weather. Know the shutoff locations, and arrange for someone to verify that the heat is working during severe cold.
If a moisture concern affects exterior materials or keeps returning after basic maintenance, call 303.543.9549 to discuss the next step.
When buying a mountain home, ask about past freeze damage, confirm insulation levels, inspect crawlspaces, locate pipes, and ask how the home was winterized. Check exposed pipes and plumbing parts for corrosion, cracks, deposits, discoloration, and other wear. A frozen pipe can burst and release hundreds of gallons of water in a short time. Get prompt professional help for a drip, signs of a leak, or another potential plumbing problem. Keep HVAC drain lines clear, and maintain the sump pump regularly.
2. Finding and repairing leaks around windows, doors, roofs, foundations, and plumbing
Check transitions where building materials meet and seals can fail. After rain or snowmelt, inspect window and door trim, ceiling corners, basement walls, and floors for stains, peeling paint, swollen wood, or dampness. Note where each mark appears and whether it changes after precipitation. A stain may show where water travels, not where it entered, so trace it upward and outward before making repairs.
At windows and doors, examine perimeter caulking, exterior trim, and nearby siding for gaps or separated joints. Check the interior sill for discoloration and softness, then compare it with the exterior. If water enters at a window, replacing interior trim alone will not fix a failed exterior seal or another opening above it. A professional assessment can identify the entry point before repairs conceal evidence of the leak.
Roof and attic checks can reveal snowmelt pathways. Inspect the attic for damp insulation, water marks on roof framing, and staining beneath roof penetrations. From a safe location, examine roof drainage and visible roof slopes. Keep drainage paths clear and address damage promptly. Ice dams can hold meltwater at the roof edge, where it may enter beneath roofing materials. Sound roof drainage and timely leak repairs help limit water intrusion.
After wet weather, inspect basement walls and window wells for water marks, damp joints, and pooling. Window-well drains should connect to foundation drains, so check that water can flow away instead of accumulating beside the wall. If seepage returns in the same place, record the conditions and have the source assessed rather than sealing only the visible interior surface.
Plumbing repairs need a careful touch. Before work, close the appropriate shutoff valve and confirm the fixture no longer receives water. Avoid over-tightening fittings or forcing misaligned connections, since improper installation can cause water loss. Some supply lines are designed to last five or 10 years; replace aging lines rather than waiting for failure. After any repair, restore water slowly and inspect the connection for drips immediately.
Use DIY work for accessible checks and straightforward tasks, not hidden or recurring leaks. If water continues after a fitting repair, appears inside a wall, or returns after rain, stop and arrange a professional inspection. Accurate diagnosis can distinguish a failed seal from a roof, plumbing, or foundation drainage problem, helping the repair address the cause rather than just the stain.
3. Maintaining flashings, sealants, vents, and expansion joints
Inspect the exterior envelope where roof edges, siding, windows, and foundation walls meet. Flashing guides water away from these transitions, while sealants close small gaps. After harsh weather, check for loose metal, failed caulking, open seams, and cracks. At roof-to-wall transitions, kick-out flashing directs runoff away from the wall. If missing or damaged, it can allow water to soak the siding and sheathing below.
Expansion joints let connected building materials move without opening uncontrolled gaps. Check them for separation, cracking, or missing sealant, especially where exterior walls meet other surfaces. Seal cracks and holes in walls, joints, and foundations to reduce water entry. A patch across a moving joint may fail again, so identify the joint type and source of movement before repairing it.
Check gutters for debris, sagging sections, and water that spills over the edge. Gutters need a slope of one-sixteenth inch for every 10 feet of length to carry runoff toward downspouts. Test newly installed gutters with a garden hose and watch the direction of flow. Downspouts should discharge away from the foundation, not beside it, where runoff can collect against the wall.
Inspect supply lines and shutoff valves at sinks, toilets, and appliances. Replace worn or aging lines and valves before they fail. Look for corrosion, bulges, damp fittings, and mineral deposits. A small drip beneath a sink can wet the cabinet floor and nearby wall. Repair the leak and dry the area instead of masking the stain.
Exterior walls need sound seals around openings and material joints. On full log homes, caulking exterior wall joints helps close cracks and gaps. For pine log siding with tongue-and-groove construction, caulking is generally needed at corners and around door and window trim. Check these areas for splits or gaps, then repair failed seals without blocking intended drainage paths.
Check vents to confirm each has an appropriate hood, works properly, and exhausts outdoors. A disconnected or damaged vent can release moisture into an attic or wall cavity instead. In storage areas, keep boxes and stored materials away from walls and leave room for air to circulate. This makes damp patches easier to spot and reduces moisture buildup behind stored items.
After each seasonal inspection, make a simple record of the location, visible condition, and repairs completed. Compare photos of the same gutter joint, flashing, or wall seam over time. If water returns after a repair, investigate connected components instead of applying another surface patch. The roof, exterior walls, joints, and drainage work together to move water away from the structure.
4. Cleaning and drying moisture-prone areas
After discovering water intrusion, stop the source if you can do so safely, then remove standing water and wet materials promptly. Move dry belongings away and record where water appeared. A leaking supply line, roof opening, or overflowing appliance can wet materials beyond the visible pool, so inspect nearby floors, baseboards, and ceilings too.
Drying needs to reach beyond the surface. Water can soak carpet backing, wallboard, insulation, and floor layers, while a wet wall cavity can support mold growth. Remove porous materials that remain wet or show water damage. If water has reached a ceiling, check the room above because leakage can travel through framing and appear far from its entry point.
Once visible water is gone, use air movers and dehumidifiers to remove moisture from affected rooms. Direct airflow across wet surfaces, not into closed wall cavities where dampness could remain hidden. A moisture meter can help assess building materials. Compare readings in affected areas with dry areas of similar material, and continue drying until readings and visible conditions show the moisture has cleared.
Identify the water source before cleanup. A broken supply line may initially involve clean water, but delays can allow contamination. Dishwasher leaks and washing-machine overflows can involve moderately contaminated water. Sewage backups, floodwater, and runoff may be contaminated, so handle them with caution. Do not treat every leak as ordinary clean water: the source affects the appropriate response.
Consider how damaged materials hold water. Carpet, drywall, plaster, and stained ceiling tiles may need removal and replacement after water intrusion. Hardwood, brick, and concrete can trap moisture deep inside, making surface drying alone inadequate. Photograph wet areas before removing materials, then keep the images and a written record of affected rooms and repairs.
To prevent recurring dampness in storage areas, keep boxes off floors and allow air to circulate around stored items. Utilizing wall-mounted or elevated storage systems from specialists like Floorguard helps keep belongings off concrete surfaces where moisture tends to pool. During cold periods, open cabinet doors beneath sinks so warmer room air can reach plumbing against exterior walls. Check for condensation, damp odors, and water marks during routine inspections, especially behind stored belongings.
Indoor humidity also matters. InterNACHI recommends keeping relative humidity between 30% and 50%, except in specialized facilities. Use a hygrometer to monitor conditions, then run a dehumidifier if readings remain high. If moisture repeatedly returns, locate its source before installing new flooring or wall finishes; covering damp materials can hide continuing water intrusion and delay necessary repairs.
5. Foundation height and drainage
Start by observing how rain and snowmelt move around the foundation. The ground should slope 5-10% away from the house, or about 1 inch per foot, for at least 10 feet. This grade encourages runoff to move away instead of collecting beside foundation walls. Check several sides of the home, since a driveway, walkway, or settled area can redirect water toward the structure.
Look for low spots, soft soil, and areas where water remains after precipitation. Fill depressions near the foundation and compact the soil so runoff does not settle against the wall. Recheck the grade after heavy rain or spring melt. If water still collects near the house, trace its route from the roof, across the ground, and toward the foundation before changing the slope.
Downspout outlets also affect foundation moisture. Extend each downspout so it discharges water about 6 to 10 feet away from the foundation. Confirm that the outlet sends water away rather than toward a walkway, window well, or neighboring low spot. A disconnected or crushed extension can release roof runoff beside the wall, even when the soil grade slopes correctly.
Check the visible foundation for damp areas, efflorescence, and cracks, especially where the wall meets the ground. These signs can indicate water reaching the foundation, though the entry path may be elsewhere. Note where they appear and whether they change after rain or snowmelt. Keep the bottom layer of logs or log siding above ground by extending the foundation above grade, reducing direct contact with wet soil.
In a mountain home with a sump pump, confirm that its discharge carries collected water away from the foundation. A pump cannot protect the structure if its outlet sends water back toward the house. Backflow or check valves in plumbing and sanitary sewer lines can help prevent floodwater from backing up through drains. Leak-detection sensors can send smartphone alerts, and some systems can automatically shut off water when a leak is detected.
Choose drainage equipment based on the water pathway it needs to control. A sump pump moves water collected at the foundation, a backflow valve limits backup through connected drains, and a leak sensor detects plumbing leaks. Each has a different role, so match the system to the observed problem and keep discharge paths clear.
After grading or drainage work, observe the next rainfall or snowmelt. Watch for pooling, water marks, and runoff flowing back toward the home. Record the locations and compare them after repairs. If dampness or cracks persist despite corrected surface drainage, water may be entering through a deeper foundation pathway that needs further assessment.
Metro Reconstruction Services, Inc.: Stucco Restoration
Metro Reconstruction Services, Inc. provides Stucco Restoration when cracks, separation, or damaged exterior finishes allow water to reach underlying materials. Because stucco is part of the building envelope, identifying the moisture source matters as much as repairing visible damage. Water entry may involve the finish, joints, or nearby transitions, so surface patching alone may leave the cause unresolved.
If an inspection reveals deteriorated stucco or related masonry damage, Metro Reconstruction Services, Inc. can assess the area and determine whether restoration, stucco replacement, or masonry work suits the condition. The repair should address the damage while considering how the exterior wall sheds water and connects with adjacent components.
For help with stucco-related moisture concerns, contact Metro Reconstruction Services, Inc.
Make Your Next Inspection Count
A useful home inspection should leave you with a clear record of what needs attention, not just a list of concerns. Note recurring damp spots, photograph visible changes, and track whether the same area gets wet after rain, snowmelt, or a plumbing leak. This history can help distinguish a one-time event from a persistent weakness in the building envelope.
Consistent upkeep is central to preventing water damage in mountain homes, but recurring moisture at an exterior finish may need more than routine maintenance. Metro Reconstruction Services, Inc. provides Stucco Restoration, Masonry Work, and Stucco installation for properties with related exterior needs. Considering the surrounding wall assembly when repairing damaged materials helps connect the work to the source of the problem.
When a stucco or masonry concern needs attention, contact Metro Reconstruction Services, Inc. to discuss the next step. A careful assessment can help you move forward with greater clarity and protect your home with informed decisions.
Frequently Asked Questions
How should gutters, downspouts, and drainage be managed on a steep mountain property?
Keep roof runoff from collecting beside the foundation or crossing areas where it can flow back toward the house. During rain or snowmelt, observe each downspout’s discharge point and follow the water downhill. Clear debris from gutters and drains so runoff has an open route. If water pools near a window well or follows a walkway toward the home, redirect it away safely.
How can homeowners protect basements and foundations from snowmelt and heavy rain?
Protect the basement by planning for water entry as well as reducing it. Connect window-well drains to foundation drains, and keep valuables out of basement areas vulnerable to flooding. Where appropriate, have professionals move key utility equipment above potential flood levels. This can reduce damage to important systems if water enters. After snowmelt or heavy rain, check basement walls, stored belongings, and utility areas for signs of water.
How should a mountain home be winterized before being left vacant?
For an extended vacancy, consider shutting off the main water supply and draining the lines after consulting a professional about the home’s plumbing system. Arrange for someone to access the property if conditions change, and consider a smart thermostat or leak detector. If power fails while the home is unattended, shutting off the water can limit the risk of a continuing leak or frozen-pipe release.
What sump pumps, backflow valves, and leak-detection systems are best for mountain homes?
Choose a sump pump you can test before leaving, and maintain it regularly. Check or backflow valves can help prevent water from backing up into drains, while leak-detection systems can send alerts or automatically shut off water when they detect a leak.