
A straightforward sliding glass door installation typically takes about a day. A project involving structural changes or a custom door may take several weeks. The timeline depends on more than fitting the door: the opening, surrounding wall, and connection to the exterior all affect the work performed by Metro Reconstruction Services, Inc.
It makes sense to want a replacement that limits winter drafts without sacrificing daylight or usable floor space. A sliding door provides a wide glass area and moves along its track rather than swinging into the room. Comfort, however, depends on how well the door fits and how its frame and seals connect to the home’s exterior.
This guide explains how door selection and installation details affect energy efficiency, natural light, and everyday access. It also covers what can complicate a replacement, from hidden moisture or damaged framing to changes at the opening, so you can understand what a durable project involves before work begins.
Key Takeaways
- Winter comfort depends on how the door, frame, seals, and surrounding wall work together to limit drafts and heat loss.
- Inspect the opening and nearby finishes for moisture or framing damage before replacement, since hidden problems can affect the installation.
- A sliding design can bring in natural light while avoiding the room clearance needed for a swinging door.
- Plan for the condition of the existing opening: structural changes and custom door requirements can affect the project timeline.
- When exterior stucco needs repair or replacement around an opening, addressing the finish and moisture protection helps preserve the surrounding wall system.
Energy efficiency for local winters
Cold-season comfort depends on more than the glass panel. For sliding glass door installation in Superior, the door, frame, seals, and wall opening must work together as one boundary. A weak connection can let cold air in or warm air out, leaving a room uncomfortable even when the glass is well insulated. Assess the complete opening before choosing a replacement.
Compare doors by their U-Factor, which measures heat loss through the whole window or door assembly. A lower U-Factor indicates better insulating performance. Review the full door specification, not just the glass description, because the frame also affects heat transfer. Metal components can conduct heat, while frame design and internal separators affect how much heat bypasses the insulated glass. Match the door’s performance to the winter conditions the opening faces.
Also inspect the weather seals and meeting rails where the sliding panels close. Worn or poorly aligned seals can create a path for drafts. The installer should check that panels travel smoothly, meet evenly, and latch without forcing. If the panel binds, the frame may be out of square or the track may need attention. A precise fit supports both day-to-day operation and the door’s ability to close tightly.
Installation details matter as much as product selection. Before fitting the new frame, examine the sill, jambs, and nearby sheathing for water damage. The sill should direct incidental water outside, and the perimeter joint needs compatible sealing and flashing. Covering a damp or deteriorated opening can hide the cause rather than fix it. Careful preparation protects the wall around the door.
- Compare the complete assembly’s U-Factor, frame, and glass details.
- Check whether the panels meet evenly and latch without pressure.
- Inspect the sill and framing for moisture damage before installation.
- Confirm the perimeter connection sheds water and limits air leakage.
Ask how insulation around the frame will be preserved. Gaps between the framing and new unit can create thermal bridging, allowing heat to bypass insulation through solid building materials. Correctly filling and sealing the perimeter helps limit this pathway. Interior trim alone cannot fix a poorly sealed joint behind it.
Review warranty language separately for the door and its hardware. Sliding door warranties commonly cover defects for 1 to 10 years, depending on the product and terms. Confirm which components are covered and how the coverage period applies. A clear understanding of the door assembly, installation details, and warranty helps you assess winter performance without relying on appearance alone.
Replacement window and door installation in Superior
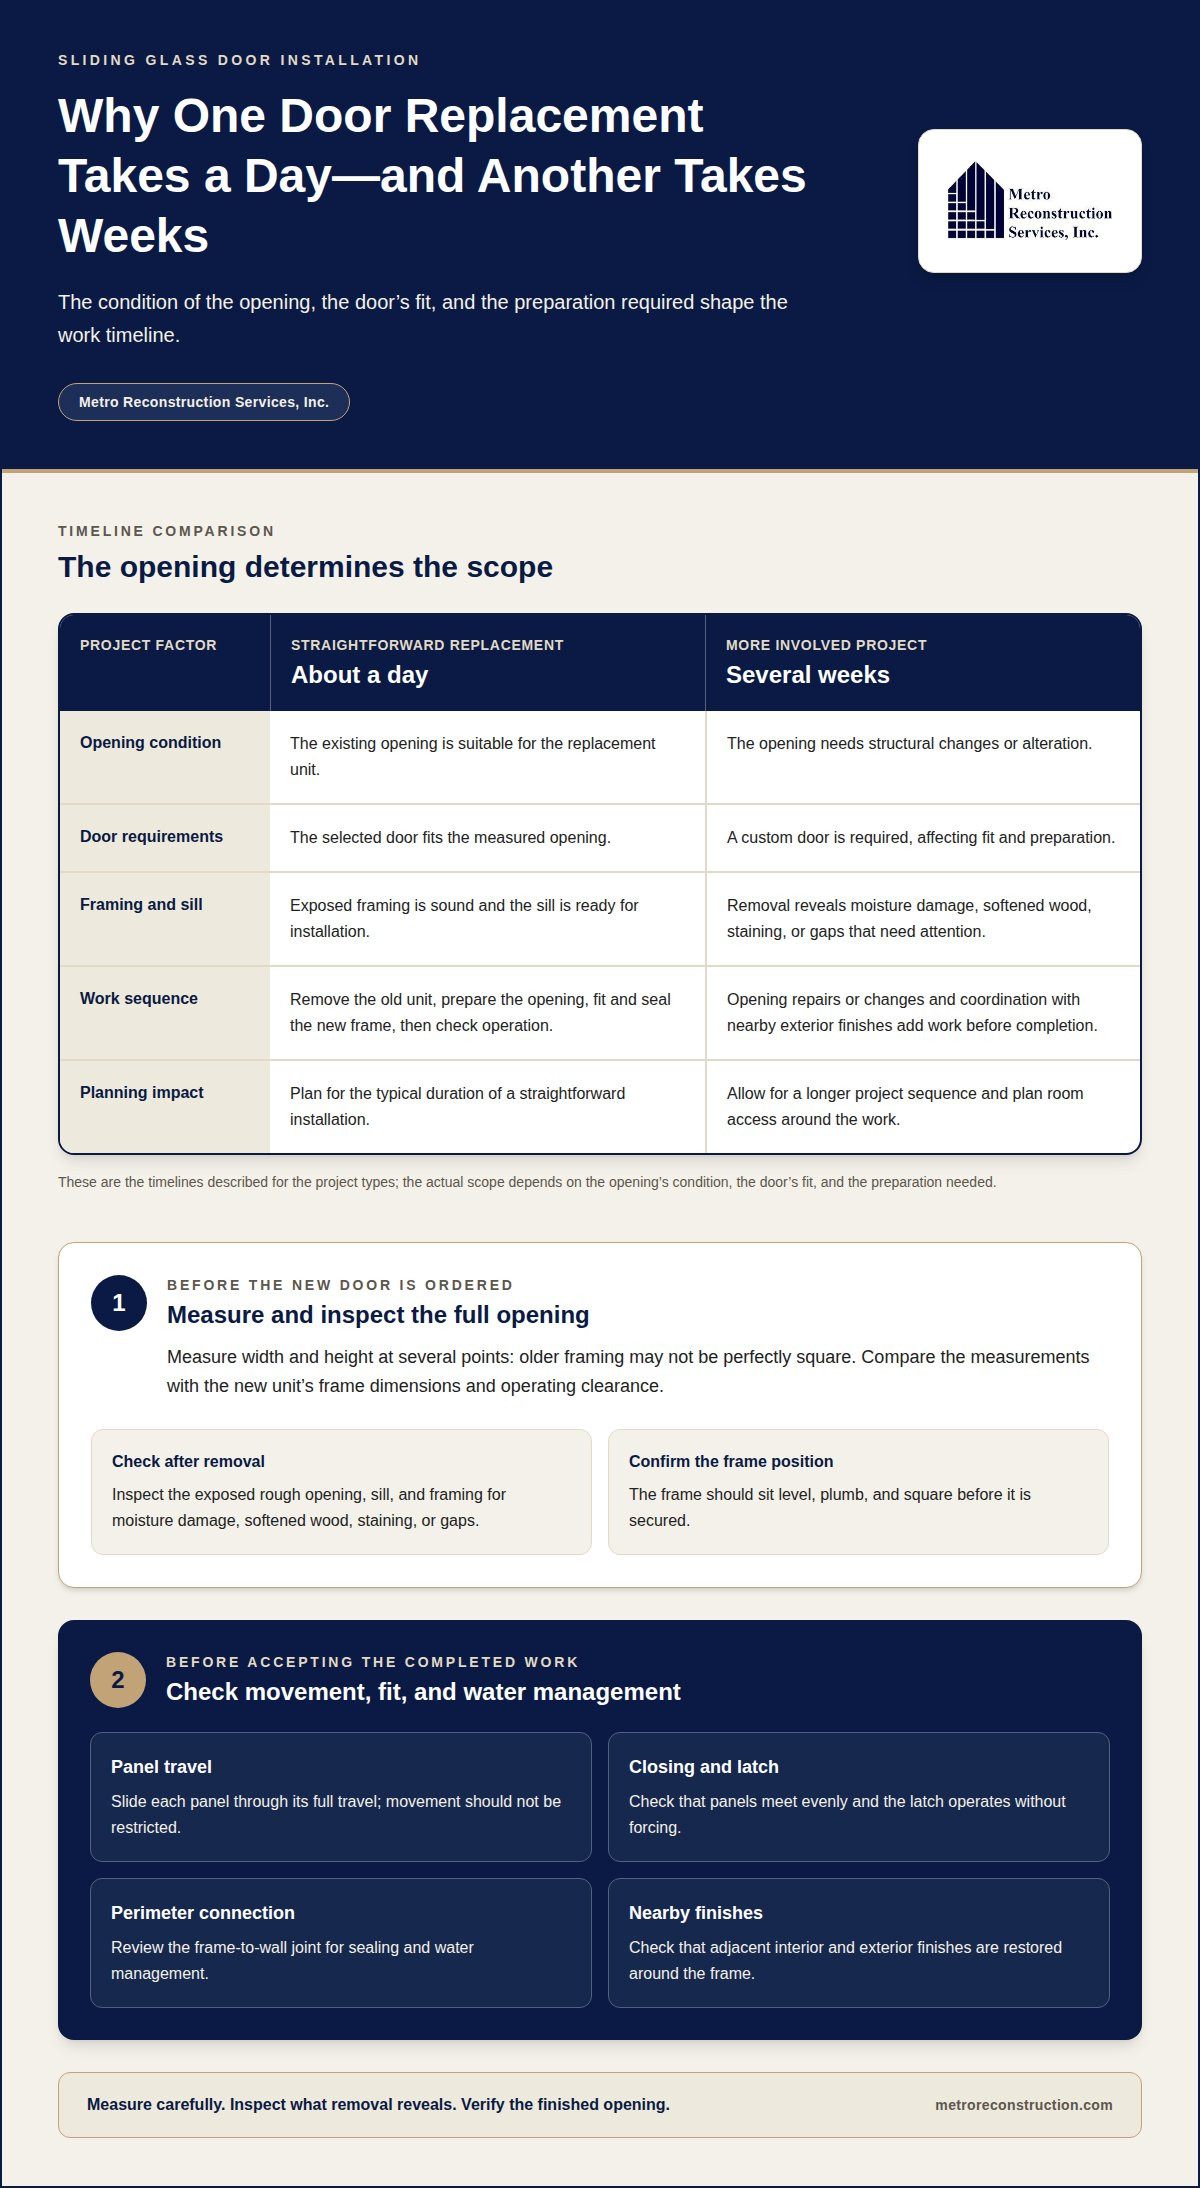
Replacing a sliding door starts with measuring the existing opening, not ordering by appearance. Record the width and height at several points, since older framing may not be perfectly square. Compare those measurements with the new unit’s frame dimensions and operating clearance. A mismatch can require adjustments to the opening and change the scope of work. In Superior, Colorado, the site assessment should also examine the surrounding wall surfaces.
Before removal, protect nearby flooring and identify where the interior trim and exterior finish meet the frame. The installer removes the old panels and frame to expose the rough opening. This can reveal conditions hidden by trim, such as softened wood, staining, or gaps around the sill. If the framing is sound, installation can proceed without structural changes. Damage or an opening that needs alteration expands the scope.
A straightforward sliding door installation typically takes about a day. Projects requiring structural changes or custom doors may take several weeks. For projects tied to broader residential renovations, design-build specialists like TimberworX Construction Group show how coordinating custom framing and structural alterations helps streamline complex remodeling timelines. The difference depends on the opening’s condition, the door’s fit, and the preparation needed. This matters when planning room access and coordinating other work. Ask for the sequence, including removal, opening preparation, fitting, sealing, and final operation checks.
During fitting, the frame must sit level, plumb, and square. Otherwise, the panels may bind, leave uneven gaps, or fail to meet properly. The installer secures the frame and addresses the joint between the frame and wall. That connection should limit air and water movement without blocking drainage paths built into the sill. Interior trim covers the joint, but should not hide unfinished sealing.
- Measure the opening at multiple points before selecting the unit.
- Inspect exposed framing and the sill after removing the old frame.
- Confirm the frame is level, plumb, and square before securing it.
- Test panel movement, closing alignment, and the latch after installation.
Finish work connects the door to nearby interior and exterior materials. If siding or another exterior finish must be removed, its edge needs a sound transition around the new frame. With masonry or stucco, the finish and water-management details around the opening need careful coordination. A well-fitted door cannot fix damaged surrounding materials on its own. The complete opening must shed water and remain properly sealed.
Before accepting the completed work, slide each panel through its full travel and operate the latch. Look for consistent contact where the panels close, gaps at the frame, or restricted movement. Review how the perimeter joint was completed and adjacent finishes restored. These checks help you spot fit or finish concerns while the work area is still accessible.
Sliding door installers serving Superior, Colorado
Choose an installer who can explain the project sequence, local review, and responsibilities for the finished opening. In Superior, Colorado, clarify who handles permit questions and how the work will connect with the home’s existing exterior materials.
Permit Requirements
Permit requirements depend on the planned work, particularly whether installation changes the opening or framing. Before scheduling removal, describe the project to Superior’s building department and ask which local requirements apply. A replacement that preserves the opening differs from work that changes its dimensions or structure. Resolve the review process before work begins so the installation plan follows local requirements.
Installation Responsibilities
Clarify who handles each stage, from site protection through final cleanup. The written scope should identify responsibility for removing the old assembly, preparing the opening, fitting the new unit, and restoring disturbed finishes. Ask how the installer will communicate if removal reveals a condition that changes the planned work. Clear responsibilities help prevent gaps between installation and finish work.
Project Scope Factors
The door’s dimensions, opening condition, access, and surrounding finishes shape the work sequence. A custom unit may need different preparation from one sized for the existing opening. Removing exterior trim or cladding can also affect how the wall finish is restored. Ask the installer to state assumptions about the frame, sill, and adjacent materials, and explain how changed conditions will be handled.
Evaluate installers by the clarity of their process, not broad claims. A useful project description identifies who measures the opening, coordinates local review, prepares the area, and restores affected surfaces. It should also explain how the door frame connects to the surrounding wall. These details clarify what the work includes before the project begins.
Discuss how concealed conditions will be documented. If removal exposes damp or deteriorated material, request a clear description of the finding and proposed next step before the area is covered. This helps you make informed decisions about the opening and surrounding structure. Keep project notes and the written scope together for reference throughout the work.
Before scheduling, confirm the permit-review plan, task responsibilities, finish coordination, and communication process. These practical points help you compare installation approaches in Superior and clarify who is accountable for each part of the work, from site preparation to completion of the surrounding exterior.
Space-saving operation and natural light
A sliding door moves along its track rather than swinging into the room. This can preserve floor space beside a dining table, sofa, or kitchen island. The panel still needs clear space to travel, and the handle must remain accessible. Before choosing a layout, map furniture placement and the usual route between the room and patio.
Large glazed panels can bring daylight deeper into a room and create wide, unobstructed views. In a Superior home, consider what the glass will face, such as a garden, deck, or neighboring wall. The view and daylight depend on the opening’s location, nearby obstructions, and interior arrangement. Keeping furniture and window treatments clear of the glass also helps preserve the view.
Check the panel’s direction of travel before finalizing the configuration. A panel that slides toward a cabinet or seating area may restrict access, even though it does not swing outward. If you plan to coordinate surrounding cabinetry or built-in storage, reviewing custom interior work from Finest Furniture Studio can offer practical ideas for managing tight clearances. Think through daily tasks, such as carrying groceries from a patio, moving chairs, or opening the door while someone passes nearby. These examples can help determine which side should move and where the handle should sit.
Review these layout details before selecting the door:
- Mark the panel’s travel area on the floor with removable tape.
- Place a chair or table nearby to test clear walking paths.
- Identify where daylight enters and whether trees or walls block it.
- Check that curtains or shades can open without obstructing the handle.
Natural light changes through the day as the sun moves, and trees or nearby buildings can shade the glass. Observe the opening at different times before deciding how much glazing suits the room. A patio door facing a shaded yard, for example, will create a different daylight effect from one facing an open deck. Interior wall color and furniture placement also shape how bright the room feels.
Ease of operation matters to the space-saving benefit. A sticking panel can make a frequently used opening inconvenient, so test movement across the track and confirm the handle is accessible. Keep rugs, furniture, and stored items clear of the operating path. If the door connects a kitchen to a patio, consider how people will pass while it is open.
Choose a configuration based on how you use the room, not glass area alone. A broad view may suit a living room, while a compact seating layout may call for careful furniture placement. Measure the usable floor area, trace the panel’s movement, and consider the view from common seating positions. These checks help balance daylight, sightlines, and access in Superior.
Average labor cost to install a sliding glass door in Superior, CO
Use your planning to define the work sequence and household arrangements. Before installation, identify which rooms, entry paths, and exterior areas the crew will need to access. Move breakable items and furniture away from the work zone, and plan where household members will pass while the opening is unavailable. Preparing the site can reduce unnecessary disruption.
Ask for a written schedule that separates the main project stages. It should show when the old door will be removed, the opening prepared, and the replacement fitted and tested. If adjacent finishes are part of the project, include their restoration in the sequence. This makes it easier to understand which areas will be active at each stage.
Clarify how decisions will be handled if removal reveals an unexpected condition. Concealed water damage, for example, may need attention before installation continues. Ask how the finding will be documented, who will explain the next step, and how you can approve a change to the work plan. Agreeing on this communication process in advance helps avoid confusion when the opening is exposed.
Keep these project details organized:
- The approved description of the planned work.
- The order of installation and finish stages.
- The person responsible for communicating site findings.
- Instructions for access, room protection, and cleanup.
- Any product and care documents provided at completion.
On installation day, keep the work area clear and ensure the crew can reach the opening from inside and outside. If the door is near a frequently used room, move daily essentials elsewhere before work begins. Keep pets and children away from tools and materials. These arrangements help maintain a clear work zone and reduce interruptions.
At the final walkthrough, operate the door yourself and ask for a demonstration of unfamiliar hardware. Check that the panels move through their full path and the latch works as intended. Review the finished interior and exterior edges, and note any follow-up items before the crew leaves. A shared walkthrough gives you a practical record of the completed work.
After completion, keep the project scope, product documents, and installation records together. If you later notice a change in operation or a problem near the opening, these records can help identify what was installed and which components were involved. A clear paper trail supports informed maintenance and more precise conversations about the door.
Metro Reconstruction Services: Stucco Restoration
Metro Reconstruction Services, Inc. can help when stucco around a door opening is cracked, loose, or deteriorated. These signs may indicate moisture behind the exterior finish, so repairing the visible surface alone may not address the underlying condition. Stucco restoration, stucco replacement, and masonry work can address damage around the opening as part of maintaining the wall system.
If the door project exposes damaged stucco or masonry, consider how the repair will meet adjacent finishes and protect the wall from water intrusion. Addressing the surrounding exterior helps maintain the opening beyond the door assembly itself.
Contact Metro Reconstruction Services, Inc. to discuss stucco or masonry concerns around your door opening.
Plan the next step with the whole opening in mind
Before scheduling work, consider how the replacement will meet the surrounding exterior. If removing the door affects stucco or masonry, those finishes may need attention to complete the opening as part of the wall system. Planning this connection early helps define the full scope and avoid leaving disturbed surfaces unresolved.
For sliding glass door installation in Superior, Metro Reconstruction Services, Inc. can address related exterior finish needs through Stucco Restoration, Masonry Work, and Stucco installation. Share the condition of the surrounding materials and the work you are planning so the conversation can focus on the relevant parts of the project.
Contact Metro Reconstruction Services, Inc. to discuss your project or call 303.543.9549. A clear plan is a sound next step.
Frequently Asked Questions
Addressing common challenges during the process?
Common challenges include unexpected damage inside the opening, difficult access, and interruptions to household routines. Before installation day, move fragile items away from the work area and plan an alternate route if the door is a main exit. Keep children and pets clear of the room while the old assembly is removed. If the project reveals a concern, document its location and understand the proposed work before it is covered.
Are Sliding Glass Doors Energy Efficient for Local Winters?
A sliding door can support winter comfort when the door and installation suit the home. In Superior, consider how the glass, frame, seals, and surrounding wall affect heat loss together. Use window coverings to reduce the chill near the glass when needed, keeping them clear of the moving panels. Appearance alone does not show how well the complete assembly will perform in cold weather.
Can the Sliding Panels Be Locked Securely?
Sliding panels can be locked, but security depends on the locking hardware, panel alignment, and frame condition. After installation, close the panels fully and check that the latch engages without forcing. If the lock misses its receiver or the panel shifts, the door may need adjustment. Keep the track clear of debris, since an obstructed panel may not close completely.
Do You Offer Different Glass Options for Privacy?
For added privacy, consider curtains or shades that suit the room and door layout. Tempered glass is a glass type, not a privacy level. Decide whether you need daytime screening, nighttime coverage, or both. Check that window coverings can move without catching on the handle or blocking the sliding panel’s path.
Expected duration of a typical project?
A straightforward installation typically takes about a day; projects requiring structural changes or custom doors may take several weeks. The schedule depends on the opening, door fit, and preparation required. Before work begins, coordinate room access and plan for the door to be temporarily unavailable. If the opening serves as a main exit, arrange another route household members can use safely.
Is Financing Available for Sliding Door Projects?
Financing is a separate payment arrangement, not an installation feature. Start with a written scope identifying the door, labor, opening preparation, and any finish work, then consider payment methods available to you. Installation duration and product selection do not establish financing terms. Keep project documents together so you can review the scope alongside your own financial arrangements.
Preparation steps homeowners should take?
Before the crew arrives, clear the path from the entry to the door and remove nearby furniture, rugs, and fragile objects. Take down curtains or shades if they obstruct access. Secure pets in another room and identify a temporary route outside if the sliding door is a primary exit. Keep the door information and project scope accessible during the work.
What warranty should I expect with a sliding door installation?
Sliding door warranties commonly cover door and hardware defects for 1 to 10 years, depending on the product and terms. Read the warranty to distinguish coverage for the door components from coverage related to installation. Keep the product paperwork and installation documents together. If an issue develops, record what happened, when it began, and which part is affected before reviewing the applicable warranty terms.