
A half-inch is a starting point, not a universal cutting rule. For most residential windows, the rough opening is typically 1/2 inch wider and 1/2 inch taller than the actual frame, leaving about 1/4 inch of clearance on each side; rough opening reframing for larger windows in Denver must still follow the selected window’s manufacturer specifications.
When enlarging a window opening in Denver, accurate measurements are only part of the job. The opening must remain structurally supported, and the sill and wall alignment affect how the new window fits and sheds water.
This guide explains how to size the opening from the actual frame, compare measurements at multiple points, and assess whether the sides are plumb and the sill is level with a slight downward slope. You’ll also learn why the framing method matters when an opening needs substantial changes, and how checking the wall plane can reveal conditions that a tape measure alone won’t catch. Careful evaluation helps you plan the work around the structure, not just the window dimensions.
Key Takeaways
- Measure the opening at multiple points and base your fit assessment on the tightest dimension, not a single reading.
- When the opening needs adjustment, preserve the framing that supports it; changes to the top or sides can affect stability.
- Plan the sill slope alongside the sheathing and surrounding framing so water can drain without causing the exterior surface to bulge.
- Check the wall plane as well as the opening itself, since a wall that is out of plumb can affect how the window and trim sit.
- When an opening is substantially oversized, reframing with proper structural members may be more appropriate than filling the gap.
How Much Bigger Should Your Rough Opening than Your Window?
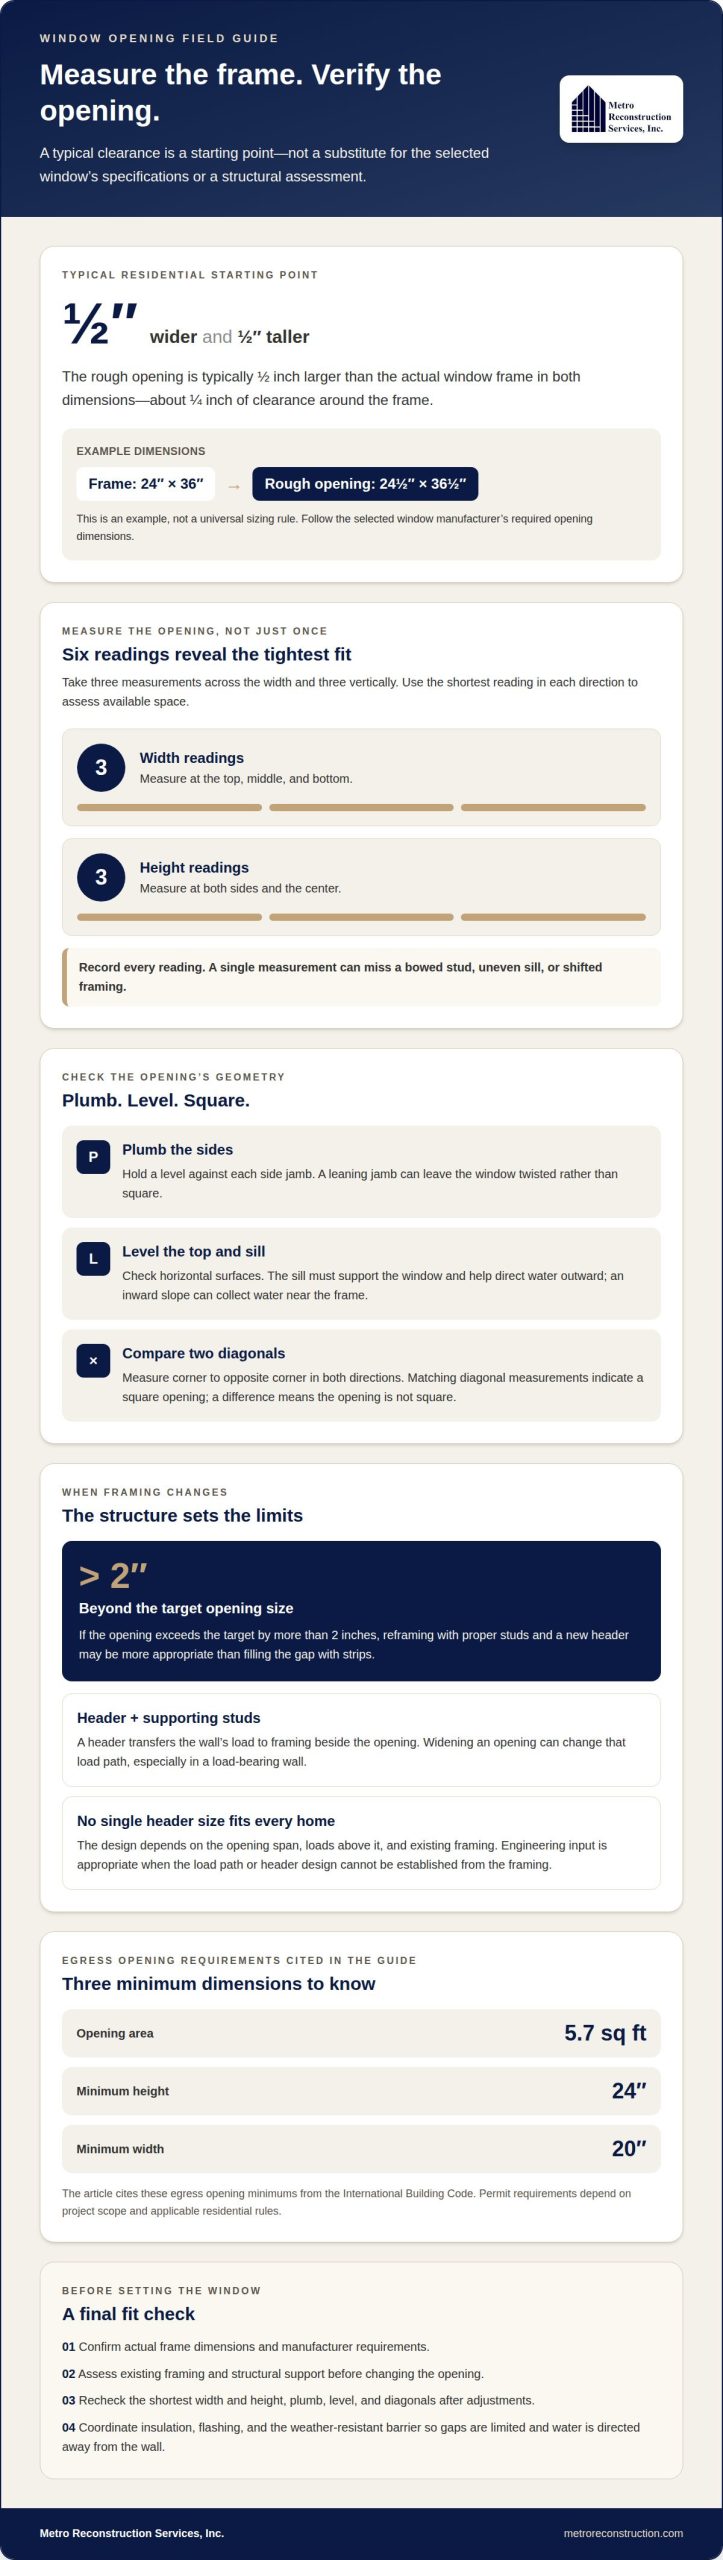
For most residential windows, the rough opening is typically 1/2 inch wider and 1/2 inch taller than the window frame. That clearance helps accommodate installation, but the selected window’s specifications determine the required opening.
Sizing the Opening Against the Frame
The rough opening is the framed space that receives the window, while frame dimensions describe the outside of the window unit. Measure the actual frame, then compare its width and height with the manufacturer’s required clearance. For example, a 24-by-36-inch frame typically uses a 24-1/2-by-36-1/2-inch rough opening. An example is not a universal sizing rule.
Use the window’s specified dimensions before cutting or adding framing. Different manufacturers can design units for different rough openings, so switching brands during replacement can change the fit. If the opening exceeds the target by more than 2 inches, reframing with proper studs and a new header may be appropriate rather than filling the gap with strips.
An insert replacement fits a new unit inside the existing window frame. A full-frame replacement removes the old unit back to the rough opening. Frame condition, water damage, sizing, and the desired finish can make full-frame work necessary. It generally involves more labor and finishing, so the method affects how much surrounding material is disturbed.
In Denver, permit requirements depend on the project scope and applicable residential rules. Enlarging an opening changes the framing, unlike replacing a window without changing its dimensions.
Code considerations include structural support and any egress function. The International Building Code specifies egress openings of at least 5.7 square feet, with a minimum height of 24 inches and width of 20 inches.
Structural Support for Wider Openings
A header spans the top of an opening and transfers the wall’s load to the framing beside it. Widening a window can change that load path, especially in a load-bearing wall, so the header and supporting studs must suit the actual conditions. Enlarging an opening is not simply a matter of cutting away more wall.
There is no single header size for every Denver home. The required design depends on the opening span, loads above it, and existing framing. Whether engineering is required depends on the project and permit review. Engineering input is appropriate when the load path or header design cannot be established from the framing.
A practical sequence is to confirm the window’s frame dimensions, assess the wall and existing support, plan the revised opening and header, then adjust the framing and prepare the opening for installation. Coordinate insulation, flashing, and water protection: the weather-resistant barrier and flashing should direct water away from the wall, while insulation limits gaps around the frame.
The work duration depends on how much framing must be removed, the installation method, concealed damage, and the finishing required. These factors also shape the project scope. For rough opening reframing for larger windows in Denver, the window frame is only the starting point; the surrounding structure and exterior layers determine the final fit.
Checking the opening for plumb, level, and squareness
Measure the rough opening at three points across its width and three points vertically. Use the shortest reading in each direction to assess available space. One measurement can miss a bowed stud, uneven sill, or shifted framing, so compare all readings before deciding whether the opening fits the window.
Plumb means a side jamb is vertically straight; level means a horizontal surface is even. Hold a level against each side of the opening, then check across the sill and top. If a jamb leans, the window may sit twisted rather than square, affecting sash movement and the contact between the frame and surrounding materials.
Compare the two diagonal measurements to check whether the opening is square. Measure from one top corner to the opposite bottom corner, then repeat between the other corners. Matching diagonals indicate a square opening; a difference means the framing forms a parallelogram. For example, a window may match the opening’s width and height but still bind if the corners are not square.
Check the sill separately: it must support the window and direct water outward. A sill that slopes inward can collect water near the frame; a level or slightly outward-sloping sill helps prevent that. The slope must still work with the window installation and adjoining wall layers, without leaving a gap beneath the unit.
Denver-area homes can have uneven openings due to older framing, previous repairs, deteriorated trim, or unusual construction. Some issues may be hidden behind finishes. Look for loose material, visible gaps, staining, and framing that changes direction. Each can affect measurements or signal that the opening needs more than a simple adjustment.
Record the measurements before changing the frame. Note the width at the top, middle, and bottom, then the height at both sides and the center. Include both diagonal measurements and mark any leaning side or uneven corner. This record gives a clearer picture than noting only the nominal window size.
After any framing adjustment, recheck plumb, level, and diagonals. Correcting one side can shift the opposite jamb or change the sill relationship, so repeat the checks before setting the window. Confirm that the shortest width and height allow the required fit and that the opening remains square enough for the frame to sit without twisting. These checks connect the opening’s geometry to window operation and water management.
Maintaining opening stability during adjustments
Changing a rough opening can disturb the framing that supports the wall above it. Keep the intended load path in view: the header spans the opening, while the surrounding studs carry its load. In an older Denver home, previous repairs or unusual framing can make those connections less obvious. Removing support before a stable replacement is in place increases structural risk.
Older Denver homes may also conceal deteriorated wood, shifted framing, or damage behind trim and exterior finishes. These conditions can affect both the opening’s stability and the window’s fit. A cut that appears limited to the opening may reach a stud or connection supporting more than the window. Inspect exposed framing and identify what each member supports before adjusting it.
If the opening is undersized, trimming the sill is preferable when the window’s position allows it. Avoid cutting the top or sides when possible, since those members may support the opening. For example, cutting a side stud to gain width can weaken the frame rather than simply create clearance.
- Expose enough of the opening to identify the header, side framing, sill, and visible connections before cutting.
- Mark the required change on the framing, keeping the planned window location and surrounding support in view.
- Make adjustments in a controlled sequence, preserving the members that carry loads until the revised support is ready.
- Recheck the opening after each adjustment for movement, loose connections, or changes to its shape.
Protect the opening while work is underway. Removing trim or exterior layers can expose the wall to moisture, so avoid leaving vulnerable areas open longer than necessary. The window, flashing, insulation, and weather-resistant barrier must work together after reframing. A stable frame alone will not protect the wall from water intrusion or air leakage.
After framing changes, inspect the connections and surrounding surfaces for movement, such as a shifted member or new gap. Repeat the fit and alignment checks before installation. Maintaining the opening means preserving structural support throughout the adjustment, not merely matching the final dimensions to the window.
The required header size depends on the actual wall framing and the loads above it.
Sloping the rough-opening sill
A sloped sill helps move water outward instead of letting it collect beneath the window. The slope must work with the window frame, sheathing, and exterior finish as one assembly. During reframing, the sill’s shape affects both window height and the wall plane. A cut that improves drainage but pushes the sheathing outward can create a new fit problem.
For a 2×6 rough-opening sill, a 5-degree slope can make the sill project beyond the other framing members. That projection matters because sheathing should meet the framing without bulging around the opening. Ripping about 1/8 inch or 3/16 inch from the full sill length can help prevent that bulge while preserving the intended slope.
Plan the cut across the full sill rather than creating a short, abrupt dip near one edge. A consistent angle gives the window an even bearing surface and lets the sill slope outward along its length. Coordinate the slope with the frame’s placement so the window has full, stable support instead of resting unevenly on a narrow edge.
If an undersized opening needs extra height, removing 1/2 inch from the sill may be an option when it keeps the new window aligned with nearby windows. That adjustment changes the sill height and the relationship between the frame and exterior trim. Compare the planned window position with adjacent units before altering the sill, especially where a continuous trim line makes alignment visible.
Before cutting, mark the intended slope and check how it meets the sheathing edge. After shaping the sill, run a straightedge along its length to spot high points or sudden changes in angle. Then confirm that the sill still supports the window frame evenly. The goal is a gradual outward path, not a surface that rocks or leaves unsupported gaps.
Consider the layers beyond the wood. The sill slope, flashing, weather-resistant barrier, and exterior finish must guide water away from the rough opening. If the sill projects, the sheathing may bow; if the slope is lost beneath the frame, water can remain near the window. These details link framing accuracy to moisture management at the wall opening.
For example, a 2×6 sill cut at 5 degrees may need a small adjustment along its length to sit flush with surrounding framing. Removing about 1/8 inch or 3/16 inch across the full sill can help the sheathing lie flat. Recheck the fit after shaping, because the correct adjustment depends on the actual framing and the selected window’s position.
Assessing whether the wall is plumb
A plumb rough opening can still sit within a wall that leans or bows. Check the wall plane around the opening, not just the framing inside it. Place a long straightedge vertically beside each jamb and compare how it meets the wall. A changing gap can show that the wall face slopes or curves, affecting how the window and trim meet the exterior.
Repeat the check across the top and below the sill. For example, a straightedge may sit flush near one corner but stand away from the wall near the other. That difference signals an uneven plane, even if the opening appears square. Record where the straightedge touches and where gaps appear to distinguish a local dip from a broader wall lean.
Denver’s older homes can have unusual framing, previous repairs, or deteriorated trim that hide the wall’s original plane. Remove or inspect accessible trim edges before deciding the wall is straight. Look for shims, patched areas, uneven cladding, and staining near the sill. Each clue can point to earlier movement or moisture exposure that affects the current opening.
Use a level or plumb line to check vertical alignment over the full height of the wall beside the window. Check both sides: one jamb can be aligned while the opposite wall face leans. Then use a straightedge horizontally to identify bows between framing points. These checks help show whether the issue is in the opening, the wall surface, or both.
Plan the window position in relation to the finished wall, not just the exposed studs. A frame set too far inward or outward can leave uneven trim, even when the opening dimensions fit. Trace how the frame, sheathing, weather-resistant barrier, and exterior finish meet. This keeps the wall’s drainage layers connected instead of treating the window as an isolated component.
Before installation, reassess the wall after any framing correction. Recheck the vertical references and straightedge contact, then confirm that the trim can meet the wall without being forced into place. If the wall plane remains uneven, the installation details must account for it while preserving support and water protection. Careful assessment shows where adjustment belongs instead of masking the condition with trim.
Metro Reconstruction Services: Stucco Restoration
Metro Reconstruction Services, Inc. can help when enlarging a window opening damages the surrounding stucco or requires restoration around the new installation. The window and exterior finish are part of the same building envelope, so stucco work should coordinate with the opening’s water-management details rather than conceal gaps or damaged edges.
Choose Stucco Restoration when reframing affects the surrounding finish or the project also requires stucco installation or replacement. Masonry Work can also suit projects where the opening meets masonry rather than stucco. The right scope depends on the wall materials and the condition around the window.
For help with stucco restoration related to your window project, contact Metro Reconstruction Services, Inc.
Plan the Next Step Around the Whole Wall
A larger window changes more than the view. Before work begins, coordinate the framing plan with the wall’s exterior layers, including the finish, flashing, and weather-resistant barrier. This keeps structural adjustments and moisture management aligned instead of treating the opening as an isolated cutout.
For rough opening reframing for larger windows in Denver, turn your measurements and observations into a clear project scope. Note where the wall plane or finish needs attention, and consider how the finished window will meet surrounding materials. If stucco or masonry around the opening is affected, include that exterior work in the planning conversation.
Metro Reconstruction Services, Inc. offers Stucco Restoration, Masonry Work, and Stucco installation. When you’re ready to discuss the exterior work connected to your window project, contact Metro Reconstruction Services, Inc. or call 303.543.9549. A coordinated plan can help you move forward with greater clarity and care for the complete wall system.
Frequently Asked Questions
How Many Times Should I Measure Before Cutting a Rough Opening?
Measure the opening at three points across its width and three points vertically, then compare the planned cut with the actual window frame. Before cutting, review the marked layout and confirm which framing members will remain. For example, a measurement from interior trim may not reflect the space behind it, so base the cut on exposed framing and the window’s required opening dimensions.
Is the Wall Plumb?
Check a vertical surface beside the window with a level or plumb line. The wall face may lean even when the opening is square, so inspect the surface where the finished trim will meet it. If the tool shows a changing gap, note where it occurs to help distinguish a local uneven area from a wall-plane condition affecting the surrounding finish.
What Are Common Window Framing Mistakes?
Common mistakes include measuring from trim instead of the window frame, assuming the existing opening suits a different replacement unit, and overlooking how exterior finishes meet the frame. Another mistake is treating a visible gap as a simple filler problem without considering the framing behind it. Before work begins, compare the actual frame dimensions, exposed opening, and surrounding wall layers so the finished assembly fits together properly.
What are Denver’s building code requirements for reframing a larger window opening?
Reframing must preserve structural support, including a header and supporting studs suited to the actual conditions. If the opening serves an egress function, the required net clear opening is at least 5.7 square feet, with a minimum height of 24 inches and width of 20 inches.