
Filling over failing mortar usually hides the damage instead of repairing it. For mortar joint repair in Longmont, deteriorated mortar must be removed before new mortar is applied, so the repair bonds to sound material rather than a loose surface.
It’s understandable to look for a quick way to seal a crack, especially when joints face moisture and freezing weather. The right repair depends on whether damage is limited to mortar or points to a wider issue with the chimney or masonry.
This article explains when repointing is appropriate, which signs can indicate broader repairs, and how deterioration, access, and related masonry damage shape the project scope. You’ll also learn what a careful assessment should cover, helping you distinguish a surface patch from work that addresses the underlying cause.
Key Takeaways
- Learn why applying fresh mortar over a deteriorated joint can conceal damage instead of resolving it.
- Recognize signs that help distinguish localized repointing from repairs involving damaged brick or other masonry.
- Understand why matching the mortar to the existing brick matters, especially when older masonry is involved.
- See how Longmont’s freeze-thaw conditions and moisture exposure can contribute to joint deterioration.
- Find out which project details shape the repair scope, from the extent of damage to access and related masonry work.
How do I know if my chimney needs repointing or a more extensive masonry repair?
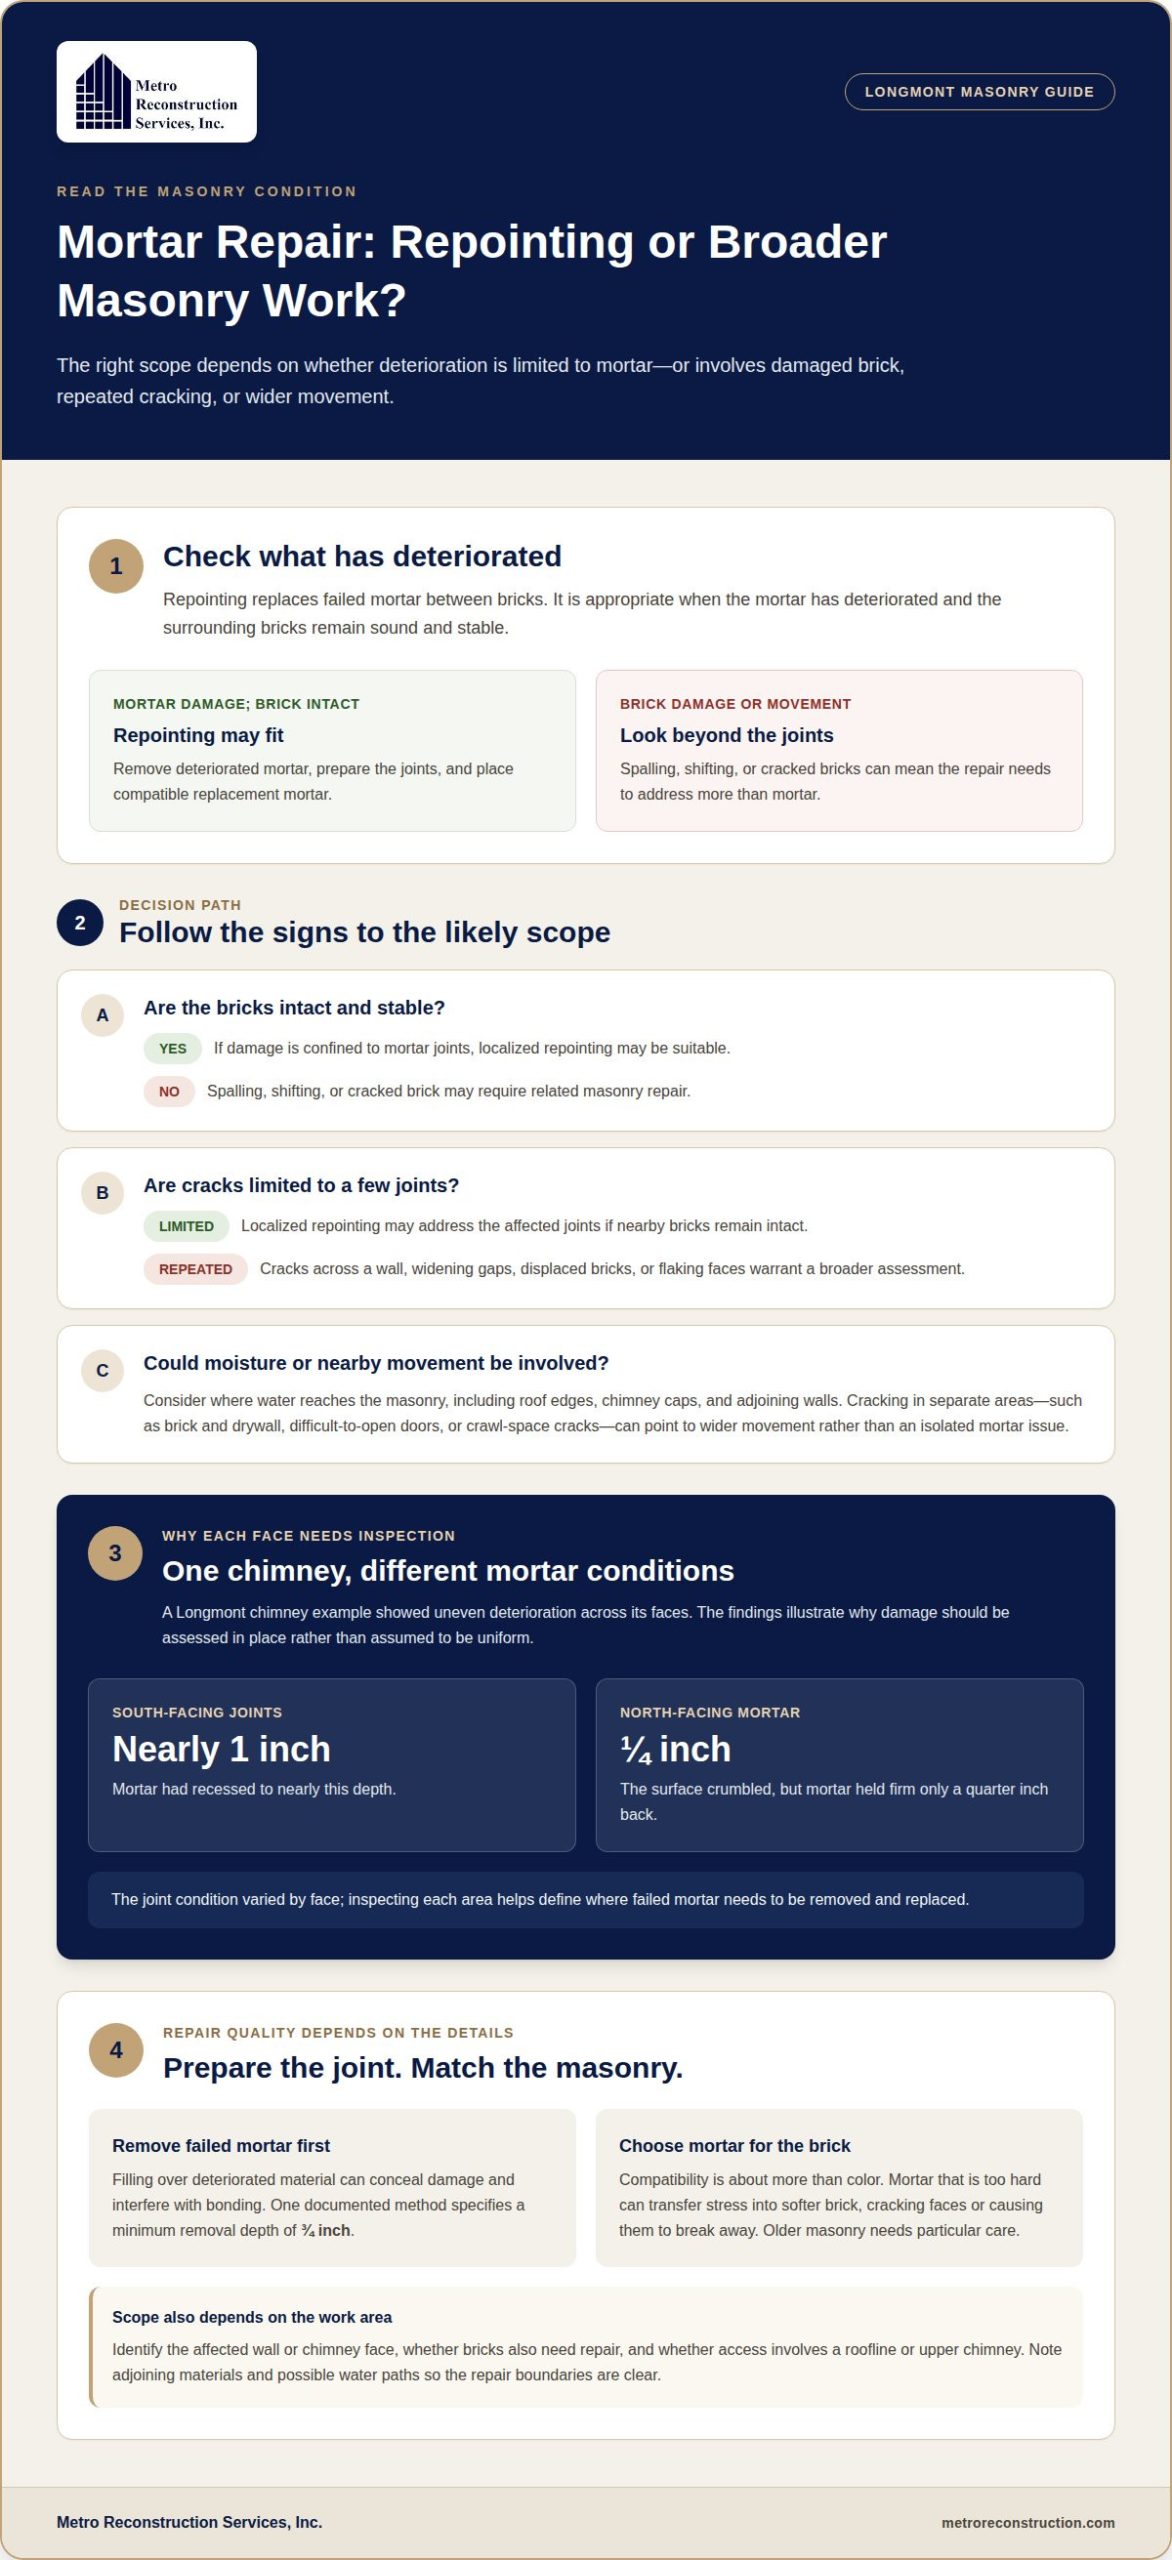
Repointing suits joints with deteriorated mortar when the surrounding bricks remain sound and stable. If bricks are spalling, shifting, or cracking, the repair may need to address more than the mortar.
Mortar Mix and Brick Compatibility
Replacement mortar must suit the existing brick, not just match its color. Mortar that is too hard may respond to movement differently from softer brick, transferring stress into the brick. Over time, that mismatch can crack brick faces or cause them to break away. Older masonry needs particular care because its original mortar may have different properties from modern mixes.
Accurate repair starts with assessing the existing masonry and joint condition. Deteriorated mortar must be removed before replacement; one documented method specifies a minimum depth of 3/4 inch. Filling only the visible surface can leave weak material behind and interfere with bonding. Choose mortar to protect the brick, not to make the joint stronger at its expense.
Brick Pointing Service Scope
Brick pointing replaces mortar between bricks. The work generally involves removing failed mortar, preparing the joints, and placing compatible new mortar. Repairs may cover a chimney face, part of an exterior wall, or joints around a brick facade. The scope depends on where mortar has lost depth or strength and whether nearby bricks remain intact.
Look for joints that have receded, crumble, or separate from brick edges. In one chimney example, south-facing joints had recessed nearly 1 inch. On the north face, mortar crumbled at the surface but held firm only a quarter inch back. Such differences show why each face needs assessment rather than assuming deterioration is uniform.
Cracked Brick Facade Mortar
Facade cracks can reflect weathering, movement, or stress near openings and corners. Their pattern matters. Cracks limited to a few joints may call for localized repointing, while repeated cracks across a wall warrant a broader structural assessment. Look for displaced bricks, widening gaps, or faces that flake away.
In the same chimney example, two brick corners showed early spalling alongside deteriorated joints. Replacing mortar alone would not repair the damaged brick. A Longmont homeowner described cracking in drywall and brick facade mortar, difficult-to-open doors, and vertical crawl-space cracks. Symptoms in different areas can indicate wider movement rather than an isolated facade issue.
Repointing and Tuckpointing Differences
Repointing removes deteriorated mortar and replaces it with mortar suited to the masonry. Tuckpointing commonly refers to a finish that creates the appearance of narrow, neat joints, sometimes with contrasting mortar lines. The terms are often used interchangeably, so clarify whether the work replaces failed mortar, changes the joint appearance, or does both.
DIY repointing can damage brick if tools cut its edges or the new mortar is too hard. Other mistakes include working over loose material, removing too little failed mortar, and leaving joints poorly filled. These errors can hide deterioration without properly repairing it. Chimney access and consistent joint preparation also affect safe, durable work, which is why homeowners often turn to specialized resources such as absolutechimneypros.com for professional chimney inspection and repair services.
Masonry services in Longmont and Northern Colorado
Masonry conditions in Longmont vary with building age, exposure, and repair scope. A brick chimney on an open lot faces different wind and moisture exposure than a sheltered facade. Planning starts with identifying the affected wall, recording visible conditions, and distinguishing mortar wear from damaged brick or broader movement.
Masonry repairs can include repointing joints, replacing damaged bricks, or repairing related parts of a wall. The right scope depends on the conditions found. For example, loose mortar on one chimney face differs from recurring cracks across a facade. A useful work description names the affected area and material rather than simply calling for brick repair.
Denver and Longmont properties can have different exposure, even within the same region. A sunny, wind-facing wall may dry differently from a shaded courtyard wall. Roof edges, nearby trees, and adjoining structures can also change how water reaches brickwork. These site conditions help explain why damage may appear unevenly across one building.
For a Longmont property, identify which wall faces show damage and where water could enter. A chimney cap, roof edge, or adjoining wall may affect moisture reaching the masonry. Record whether cracks occur near windows, corners, or material transitions. These details help distinguish localized joint wear from a pattern that warrants broader structural assessment.
Before planning masonry work, note whether access involves a roofline, an upper chimney, or a wall beside another exterior finish. Also record whether the proposed work affects mortar joints, individual bricks, or both. For example, a chimney repair beside a stucco wall may require careful planning around the adjoining surface. These details help define the work area and how adjacent materials should be protected.
Across Northern Colorado, a useful assessment identifies the masonry type, maps visible deterioration, examines adjacent materials, and defines repair boundaries. For example, a cracked joint beside a roof transition calls for attention to the water path, not just the mortar line. Nearby exterior components can affect whether repaired masonry stays protected from moisture.
Common project questions include whether work is limited to joints, whether damaged brick needs attention, and whether the chimney’s structure will change. The answers depend on observed conditions. Replacing mortar won’t secure a loose brick, and filling a crack won’t explain its cause. A clear scope connects each task to a specific condition.
Photographs can help describe the concern, especially when they show the full wall and close views of affected areas. They may not reveal loose material inside a joint or hidden moisture paths. A site assessment can examine those conditions and define repair boundaries more accurately.
For projects in Longmont or Denver, include the property location, affected masonry, and intended changes in the work description. This supports a focused discussion about project scope without assuming every building needs the same repair just because it is in the same city.
Choosing local professionals
For brick repair in Longmont, judge the proposed work by its diagnosis, not its label. A chimney with loose joints needs a different scope from a facade with displaced bricks. A useful assessment identifies affected areas, mortar condition, brick damage, and possible moisture paths. It should explain why each repair step fits the observed conditions.
Reviews of masonry contractors in Longmont, CO, can offer context, but they don’t establish the right repair for your wall. Look for specific descriptions of the work, such as chimney repointing or brick facade restoration, rather than general praise alone. A review describing the original problem and completed scope offers more useful context than a rating without details.
Notice whether a review describes clear communication about the repair process. For example, a homeowner might mention an explanation of which joints needed replacement and which bricks remained sound. That detail helps you understand the experience being described. Reviews can’t confirm your masonry’s condition, so they should complement, not replace, a property-specific assessment.
A written scope should name the affected surface and repair method. For a chimney, it might distinguish the south-facing joints from the north-facing face. It should also clarify whether the work addresses mortar only or includes damaged brick. Specific boundaries make it easier to understand what the proposed repair will and won’t address.
Ask how the existing brick and mortar inform material selection. A repair plan should account for compatibility, since overly hard mortar can stress softer brick. It should also explain how deteriorated mortar will be removed and sound joints prepared. These details show whether the scope focuses on masonry performance or only its finished appearance.
Notice whether the assessment considers the complete wall assembly. A crack near a roof edge, window, or material transition may have a different moisture path from a crack in an exposed chimney. For example, water entering above a facade can contribute to recurring joint damage. Replacing mortar without addressing the entry point may leave the underlying condition unchanged.
Clear project communication should connect findings to the proposed work. The explanation might identify loose joints, visible brick spalling, or cracks across separate areas. It should distinguish localized repairs from broader structural concerns and describe the limits of the planned scope. Those distinctions help you understand why a repair is recommended.
For a Longmont masonry project, focus on evidence: documented conditions, compatible materials, defined repair boundaries, and a clear explanation of each step. Reviews can help you assess communication, while the property’s actual brickwork determines the repair needs. A precise scope gives you a practical basis for understanding the work before it begins.
For mortar repointing, useful reviews describe which joints were repaired and whether the work included damaged brick. These details help compare reported project experiences, while the repair choice should still be based on an assessment of your masonry.
Colorado freeze-thaw exposure
Longmont masonry faces repeated changes in temperature and moisture. Water can enter open joints, then freeze as temperatures fall. Freezing water expands inside small gaps, placing pressure on surrounding mortar and brick. When it thaws, the masonry may remain damp. Repeated cycles can gradually loosen joints and expose more surfaces to moisture.
Sun and shade create different drying conditions on one building. A south-facing wall may warm quickly, while a shaded chimney face stays damp longer. Wind-driven rain can wet exposed joints, and roof edges can direct runoff toward brickwork. These differences help explain why deterioration may appear on one side first rather than evenly across a facade.
A Longmont home built in 1906 was described with new wall cracks and stones that appeared to have spilled over in the foundation. Those signs call for attention beyond a single mortar joint. A crack pattern may involve masonry movement or another structural condition. The visible surface alone cannot establish the cause.
Water history can add useful context. A Longmont homeowner associated possible property water intrusion with the 2013 floods. That report doesn’t establish why later masonry symptoms developed, but it shows why exposure history matters. Note where water entered, which walls were affected, and whether cracking appeared afterward. Those details can guide a focused assessment.
Look at the full water path around the masonry. Check the chimney top, roof transitions, adjacent walls, and ground near the foundation. For example, a damaged cap can let water into a chimney from above. A blocked or poorly directed runoff path can keep nearby brick damp. Repointing alone won’t correct an active water source.
During an assessment, map each crack and note whether it crosses mortar, brick, or both. Record loose material, flaking brick faces, and areas that stay damp. Compare exposed and sheltered sides of the same chimney. This simple sequence helps distinguish weather-related joint wear from damage that may extend into the masonry or structure.
After repairs, moisture management remains essential. Keep roof drainage directed away from walls, and address openings that admit water. Watch repaired areas through changing weather for renewed cracking, loose mortar, or damp staining. In Longmont’s freeze-thaw conditions, lasting masonry care depends on sound joints and controlling the water that reaches them.
Cost snapshot
A clear project snapshot starts by defining the masonry involved. Record whether the work concerns a chimney, an exterior wall, or several connected surfaces. Note the location of each affected area and how it relates to nearby roofs, windows, and finishes. This gives the repair discussion a specific starting point instead of treating the entire exterior as one uniform surface.
Describe the visible condition in practical terms. For example, note whether joints are recessed, cracked, loose, or missing, and whether nearby bricks show surface damage. Separate observations by wall face or section. That helps distinguish a small repair area from damage spread across adjoining masonry, without relying on a broad description such as “the brick needs work.”
Access is another useful planning detail. A ground-level wall, an upper chimney, and masonry beside a sloped roof each present different working conditions. Mention nearby landscaping, narrow passages, or surfaces that need protection. These site details help clarify how the work area can be reached and which surrounding parts of the exterior need care during the project.
Material compatibility should be part of the discussion before work begins. The existing brick and mortar provide clues about suitable replacement materials. A color match alone doesn’t show whether materials are compatible. For example, a historic brick wall and a newer addition may have different masonry characteristics, so each area may need a separate assessment.
Also describe whether the concern involves more than the joints. A loose brick, damaged corner, or recurring crack changes the repair description. Note nearby roof edges or other transitions that could affect water reaching the wall. The goal is to connect each observed condition with the work being considered, rather than group unrelated issues under a single repair label.
Useful project records include clear photographs, a marked description of affected locations, and notes about when symptoms appear or change. For instance, a damp mark below a chimney after rain adds context that a close-up of a cracked joint can’t show. These observations help keep the assessment focused on both visible masonry and its surrounding conditions.
Before work is scheduled, make sure the written description identifies the repair areas, materials under consideration, access needs, and any adjacent surfaces involved. If the planned work changes after opening the masonry, the revised scope should distinguish newly observed conditions from the original observations. Clear documentation helps everyone understand what the project addresses.
For a Longmont masonry project, send a project inquiry with the affected location and a description of what you see. Sharing those details gives the initial conversation a practical focus and helps move the property assessment toward a clearly defined repair plan.
Metro Reconstruction Services, Inc.
Metro Reconstruction Services, Inc. provides masonry work for homeowners assessing deteriorated joints, cracked brick, or related exterior damage. If you’re unsure whether the issue is limited to mortar or involves a wider part of the masonry, a project assessment can help define the repair scope. The goal is to connect visible symptoms with the surrounding exterior, rather than treat one crack as an isolated surface problem.
Where masonry meets stucco, the surrounding finish may also need attention. Metro Reconstruction Services, Inc. offers stucco restoration, installation, and replacement as part of its exterior work.
If you’re ready to discuss your Longmont masonry concerns, contact Metro Reconstruction Services, Inc. or call 303.543.9549.
Plan the next step for your masonry
Before moving ahead, decide what you need the repair to accomplish. You may want to preserve original brickwork, restore a consistent facade appearance, or address concerns about moisture entering the wall. Naming that priority helps shape a focused conversation about the work, its boundaries, and the condition you want the finished masonry to serve.
For mortar joint repair in Longmont, the next step is turning visible concerns into a clear project discussion. Note the areas that matter most to you and explain how you use the space around them. That context can help frame the assessment around your property, rather than treating the repair as an isolated cosmetic task.
Metro Reconstruction Services, Inc. can discuss masonry concerns and related exterior conditions with you. Contact Metro Reconstruction Services, Inc. to start a conversation about your project. With a clear goal and an accurate assessment, you can move toward a repair plan that fits your home.
Frequently Asked Questions
Can you just fill over the old mortar?
No. A fresh layer may bond only to the exposed surface while dust, loose grains, or voids remain underneath. For example, capping a narrow crack can leave water a path through the joint behind the new layer. The repair needs to account for the existing mortar’s condition, including whether it can remain in place or needs to be removed and replaced.
Can you just skim new mortar over the old joints instead of cutting them out?
No. Skimming leaves the original joint in place, so deteriorated material remains beneath the thin outer layer and can cause it to separate. The added mortar may also change the joint width and hide whether damage is spreading. Repointing replaces failed mortar within the joint; it isn’t simply a coating over the existing surface.
What joint profile do you use, and does it actually matter in Colorado’s climate?
The profile should suit the existing brickwork and surrounding joints. A concave profile is shaped with a rounded tool, while a flush profile finishes level with the brick faces. The shape affects the joint’s appearance and how water runs across it, but it can’t correct water entry by itself. Consistent tooling and appropriate moisture management matter in Colorado’s changing weather.
Why does the mortar mix have to be matched before cutting starts?
Assess the existing mortar before removing it, while its color, texture, and condition remain visible. Those clues help guide material selection, though appearance alone doesn’t establish compatibility. Choosing a replacement mix first can also help avoid removing sound material unnecessarily. The aim is a joint that works with the brick, rather than one so rigid that it transfers stress into the masonry.
What is the mortar joint repair cost per square foot in Longmont, CO?
For mortar joint repair in Longmont, a per-square-foot figure won’t capture the full scope. Access, chimney height, deterioration depth, damaged brick, and related water-entry work can all affect the project. The price depends on the case and is provided after a quote request. A useful estimate defines the affected areas, preparation, material needs, access, and any related masonry repairs.
How can you identify mortar joint damage in brick walls?
Look for joints that have pulled away from brick edges, shed grains, or formed recessed channels. White, powdery deposits can appear when moisture carries minerals to the surface, though they don’t identify the water source. Compare neighboring joints and photograph the same area over time. Note brick that flakes, shifts, or cracks separately, since those signs involve the masonry units themselves.
What is the best mortar type for repointing brick homes in Colorado?
No single mortar type suits every Colorado brick home. The right mix depends on the existing brick and mortar, their condition, and compatibility with the masonry. A mix that is too hard can harm softer brick, so color matching alone isn’t enough. Assess the wall before selecting a product; the replacement joint should protect the brick rather than transfer stress into it.
What is the mortar joint repair process, and how long does it take?
Repointing typically involves inspecting the joints, removing deteriorated mortar, preparing the openings, placing replacement mortar, and shaping the finished joints. Most chimney repointing jobs take one to two sessions, depending on scope. A single chimney face with moderate joint deterioration typically takes a half to a full day. Access, damage extent, and related brick repairs also shape the schedule.