
A stucco patch won’t solve water damage while moisture is still getting behind the wall. Lasting stucco water damage repair starts by tracing and stopping the leak, then drying and repairing affected materials before rebuilding the finish. Homeowners insurance coverage depends on the cause of the damage and the terms of your policy.
It’s natural to focus first on the visible stain, crack, or soft spot, but these signs don’t always reveal where water is entering. Covering the symptom without addressing the entry point can leave the wall vulnerable to recurring damage.
This guide explains how to recognize moisture damage, investigate common entry points around windows, doors, flashing, and roof connections, and dry and repair the affected area. You’ll also learn how to patch and texture stucco to blend with the surrounding surface, and when damage calls for more than a small patch.
Key Takeaways
- Trace moisture to its entry point before patching stucco, since covering the surface alone can leave the underlying cause unresolved.
- Look for stains, soft areas, swelling, cracks, and separation, then assess whether moisture has reached materials behind the finish.
- Remove damaged stucco carefully so the wall beneath can be inspected, dried, and repaired before the finish is restored.
- Build a patch in layers and match its texture to the surrounding surface for a more consistent repair.
- Insurance coverage depends on the cause of the damage and your policy, so keep records of the affected area and repair work.
What Leads to Stucco Water Damage?
Water damage often starts where stucco meets another building component. Failed sealant, missing flashing, cracks, and gaps around windows or doors can let water pass behind the finish. Effective repair begins by finding the entry point, not simply covering the visible stain.
You can patch a small, isolated area if the surrounding stucco is sound and the wall behind it is dry. Bring in a professional when damage extends behind the finish, affects the sheathing, or returns after a patch. These signs call for investigating more than the surface.
Permit requirements depend on the repair scope and local rules. A surface patch may be treated differently from work that removes stucco or repairs underlying wall materials, so establish the full scope before rebuilding the exterior.
To limit future water entry, maintain sealant at joints, keep drainage paths clear, and repair damaged flashing at windows and roof-to-wall transitions. In climates with repeated wetting and freezing, trapped moisture can worsen cracks and damage wall layers.
Local conditions affect both material choices and the work involved. Wind-driven rain, freeze-thaw exposure, and building requirements influence how the wall should shed water and how much damaged material needs to be removed.
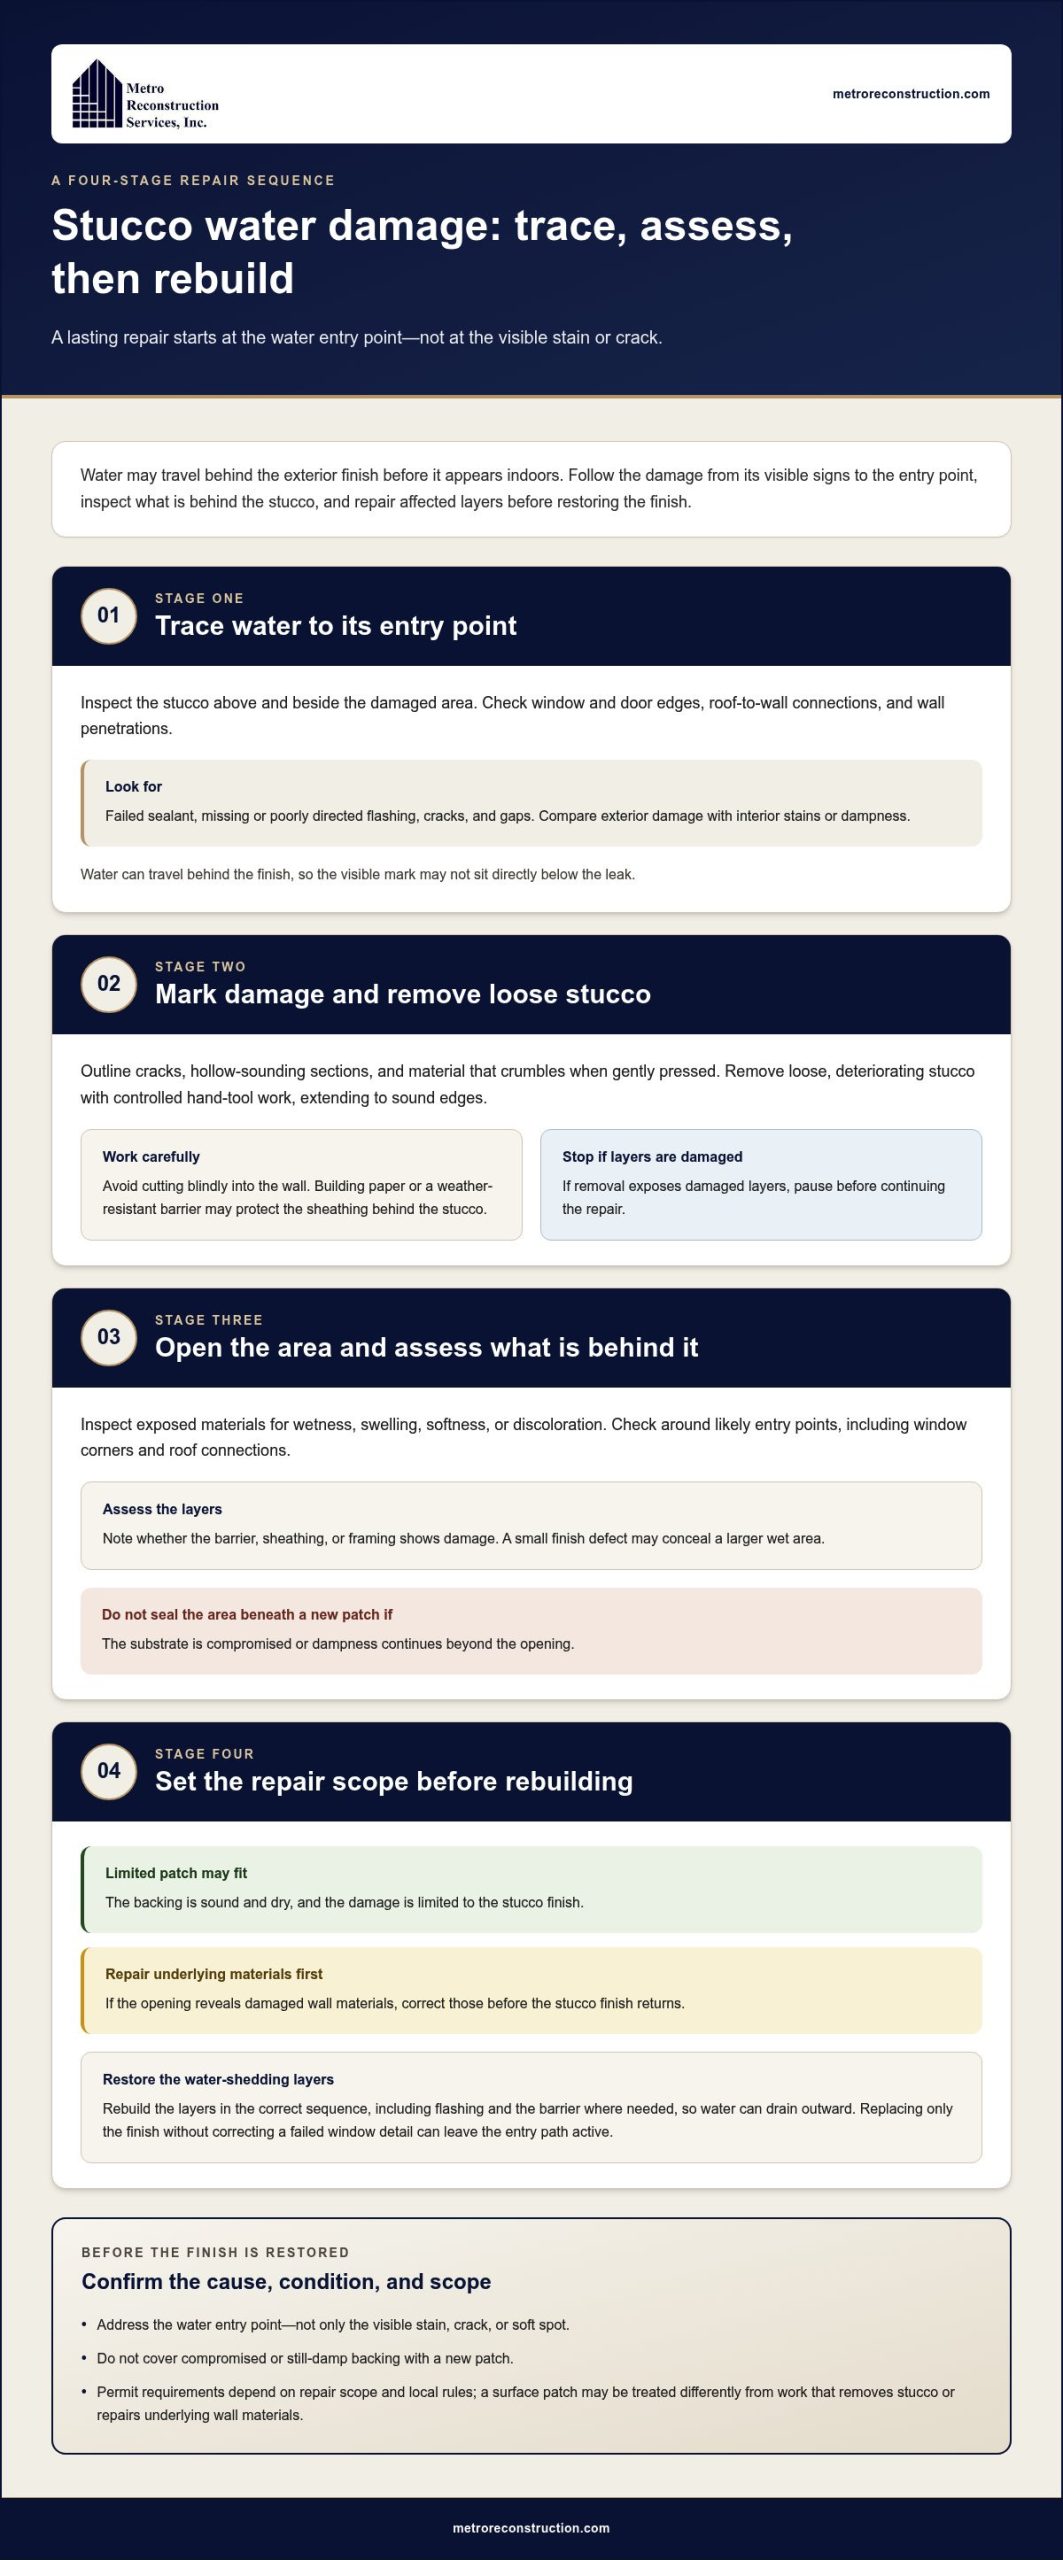
- Trace water to its entry point. Inspect the stucco above and beside each damaged area, including window and door edges, roof-to-wall connections, and penetrations through the wall. Look for failed sealant, missing or poorly directed flashing, cracks, and gaps. Water can travel behind the exterior finish before appearing indoors, so compare the exterior damage with interior stains or dampness. Don’t assume the visible mark sits directly below the leak.
- Mark the damaged area and remove loose material. Use a pencil or low-tack tape to outline cracks, hollow-sounding sections, and stucco that crumbles when gently pressed. Remove deteriorating and loose material with controlled hand-tool work, extending to sound edges rather than leaving a weak border. Avoid cutting blindly into the wall. Behind stucco, building paper or a weather-resistant barrier may protect sheathing, so stop if the removal exposes damaged layers.
- Open the wall enough to assess the damage. Once loose stucco is removed, inspect the exposed surface for wet, swollen, soft, or discolored material. Check around the likely entry point, such as a window corner or roof connection, and note whether the barrier, sheathing, or framing shows damage. A small finish defect may conceal a larger wet area. If the substrate is compromised or the damp area continues beyond the opening, don’t seal it beneath a new patch.
- Choose the repair scope before rebuilding. Match the work to what the opening reveals: sound, dry backing may support a limited patch, while damaged underlying materials require repair before stucco returns. Restore the water-shedding layers in the correct sequence, including flashing and the barrier where needed, so water can drain outward. Local climate and repair extent affect the materials and steps required. Replacing only the finish without correcting a failed window detail can leave the entry path active.
Signs of stucco and moisture damage
Look for changes in the exterior finish and nearby interior surfaces, and compare their locations. Stains, soft areas, swelling, cracks, and separation can all signal moisture exposure.
-
Identify Interior Moisture Signs
Inspect the room behind stained, cracked, or separated stucco. Look for brown marks on drywall, bubbling paint, swollen trim, soft wall areas, or damp patches near an exterior-facing window. A ceiling stain near an outside wall may also point to a leak path. Note each location and whether it changes after rain. Interior paint or caulk won’t fix moisture entering from outside.
-
Inspect and Test for Moisture
Check the stucco for discoloration, cracks, bulging, and areas that sound different when tapped lightly. A moisture meter can help assess suspicious wall areas; some readings use small probes inserted into the wall cavity. Caulk and reseal the probe holes after testing. Record each test location and result, then compare nearby areas. A dry reading in one spot doesn’t mean the entire wall is dry.
-
Find Moisture Entry Points
Trace the exterior wall upward from each interior stain or damp patch. Inspect window and door edges, joints, roof-to-wall connections, and worn sealant for cracks or openings. Check whether water can drain away from these transitions instead of collecting against the stucco. Photograph each suspect area and note its position relative to the interior sign. Arrange a prompt leak inspection, especially for signs on an exterior-facing wall or ceiling.
-
Assess Risks from Hidden Moisture
Look beyond the finish if stains recur, stucco separates, or a wall stays damp. Moisture trapped behind stucco can affect concealed materials, including wood sheathing and framing; prolonged wetness can contribute to wood deterioration. Damp conditions can also support mold growth. Extensive damage involving mold or structural problems needs remediation before patching. Don’t cover soft backing or a musty area with fresh stucco.
Keep an inspection record with dated photographs, locations, and moisture-meter readings. Recheck repaired areas after rainfall and over time: a later crack can create a new leak, even if an earlier inspection found no moisture. Compare exterior and interior evidence, since a surface crack alone doesn’t show how far water has traveled behind the finish.
Texturing a stucco patch to match the surrounding surface
Rebuild the patch only after repairing and drying the backing. Then match the stucco’s layers, texture, and finish to the adjacent surface, since each affects the final appearance.
- Prepare the patch edges and backing. Remove loose stucco until the opening has firm edges, and clear away dust that could weaken the bond. The exposed backing must be sound before new material goes on. Keep the patch boundary simple enough to work evenly, but don’t cut into building layers that remain intact. If the opening reveals damaged backing or unresolved moisture, stop before covering it; a textured surface cannot correct a problem beneath the finish.
- Choose compatible stucco and build the layers. Use a stucco mix suited to the existing exterior, because a patch that differs in material or thickness may dry and appear differently. A three-coat stucco system has a scratch coat, brown coat, and finish coat. Apply each layer in sequence, allowing drying time between applications. Follow the mix instructions for preparation and placement, and avoid applying the next coat while the prior layer is still wet. Proper curing between repair steps helps the patch set before its texture is formed.
- Study the surrounding texture before shaping the finish. Examine the wall in natural light and note whether the surface is smooth, sandy, ridged, or stippled. Look at the same wall area from more than one angle, since shadows can make a texture seem deeper. Test your chosen tool and motion on a spare board or inconspicuous practice surface first. A sponge, brush, or trowel can leave different patterns, so match the existing marks rather than choosing a pattern by habit.
- Texture the finish and compare it as it dries. Apply the finish coat to the patch, then reproduce the nearby pattern with consistent pressure and spacing. For a stippled surface, use repeated light touches; for a ridged surface, follow the direction of nearby lines. Keep the patch edge blended without flattening the surrounding stucco. Check the result from several feet away and at an angle. Wet material can look different as it dries, so avoid adding more texture based only on its immediate appearance.
- Review color and appearance after curing. Compare the repaired area with adjacent surfaces once dry. Existing coating age and sun exposure can affect how closely a new patch appears to match, even when its texture is similar. A small repair may remain visible against an older wall. If the finish differs, consider the whole wall’s appearance before making additional changes, and don’t apply a coating over uncured stucco.
Drying and remediating the affected area
Dry the wall and repair damaged materials before rebuilding the stucco finish. Follow these steps in order.
- Expose the affected wall layers. Remove stucco where water damage has extended beyond the surface, opening the wall enough to inspect the materials behind it. Work carefully around windows, doors, and other transitions so you can see where moisture has traveled. A small stain may correspond to a larger damp area, so don’t limit the opening to the visible mark. If the exposed sheathing or framing appears damaged, include it in the assessment before planning the finish repair.
- Remove damaged and contaminated material. Separate wet, deteriorated, or visibly mold-affected material from sound parts of the wall. Stucco replacement alone won’t address damaged sheathing or other affected layers beneath it. Keep the work area organized, and note which materials were removed and where. If the damage includes mold or structural concerns, don’t cover the area with new stucco; extensive damage needs remediation before rebuilding. A surface patch can conceal unresolved problems rather than correct them.
- Clean and dry the opened area. Clean the exposed surfaces and allow the affected wall materials to dry before closing the assembly. Don’t rely on the exterior stucco feeling dry, since moisture can remain behind the finish. Use moisture readings at the exposed area and nearby wall locations to help assess drying progress. Keep the wall accessible during this stage, and avoid installing replacement materials while the substrate remains damp. The time required depends on the affected materials, the extent of wetting, and drying conditions.
- Recheck the wall, then restore its layers. Confirm the affected area is dry and that damaged materials have been addressed before rebuilding. Keep interior drywall easy to remove where inspection access is needed, and check the wall again after a couple of months. That follow-up can help identify recurring moisture, though a new crack may create a later leak. Restore the wall layers and water-management details before applying stucco. Replacing only the visible finish while leaving damp backing in place can lead to repeat deterioration.
Causes of stucco water damage
Water behind stucco usually points to a weak connection or drainage detail in the wall assembly. Finding that pathway helps determine whether the repair needs to address only the finish or concealed materials as well.
- Check the drainage layers behind stucco. Stucco can absorb and hold water, so the layers behind it need a way to manage moisture. Problems can develop when stucco is installed without a capillary break or effective drainage path. At an exposed area, inspect the weather-resistant barrier and look for signs of trapped water. Two layers of weather-resistant barrier or a drainage gap can help manage water behind stucco. These details support drainage, but they don’t identify the leak by themselves.
- Inspect window and door transitions. Water can enter around windows, doors, and other wall openings when flashing or sealant fails. Look above windows for head flashing and weeps, then check whether the barrier above laps over the flashing. At the sill, a flexible flashing layer should lap over the barrier below, while a metal sill pan should extend beyond the stucco finish. These connected details direct water outward; gaps or incorrect laps can funnel it into the wall.
- Trace roof runoff at wall connections. Inspect where a roof meets a stucco wall, especially below roof edges and near openings. Failed flashing or worn sealant can allow runoff behind the finish instead of directing it away. Follow interior stains upward and compare their position with exterior transitions. Since water can travel behind the wall before appearing indoors, the nearest crack may not mark the original entry point. Record possible openings and inspect the surrounding details before choosing a repair.
- Assess cracks and movement. Settling and impact can create stucco cracks or holes that admit water. Thermal expansion can also contribute to movement as building materials respond to temperature changes. A crack alone doesn’t prove that the wall assembly has failed, but it deserves attention when nearby drainage details are weak. Note whether the crack crosses a transition, follows a straight joint, or appears near a window corner. Those details can help distinguish surface movement from a possible water-entry path.
- Match the repair to the cause. Effective stucco water damage repair addresses the entry point and any affected wall layers, not just the visible mark. Check whether water came through a window, door, roof connection, opening, or worn sealant. Then assess the barrier and backing before rebuilding. Patching over an active leak can leave moisture trapped behind the new finish. By correcting the water path first, the repair can restore how the wall sheds water as a complete assembly.
Metro Reconstruction Services: Stucco Restoration
Metro Reconstruction Services, Inc. provides Stucco Restoration when water damage extends beyond a surface crack or patch. If inspection reveals deteriorated stucco, damaged backing, or a wall that needs rebuilding, the work may include stucco replacement or installation. Masonry Work can repair affected stonework that forms part of the same exterior surface.
Accurate repairs begin with understanding how water entered and which wall layers need attention. This helps distinguish a localized finish repair from restoration that must address the surrounding assembly. For a damaged or persistently wet stucco wall, contact Metro Reconstruction Services, Inc. to discuss the next step: 303.543.9549.
Plan the Next Step for Your Stucco
Use your inspection notes to prioritize the moisture source, concealed wall damage, and the finish itself. Address them in that order. A new surface can look complete while an unresolved entry point continues to affect the wall behind it.
Before arranging stucco water damage repair, gather clear photographs of the affected exterior and any related interior marks. Note their locations and whether they change after wet weather. These details help focus the discussion on the repair scope and the condition of the surrounding exterior.
If the damage extends beyond a small, dry patch, or you’re unsure what lies behind the stucco, Metro Reconstruction Services, Inc. can discuss restoration options with you. Contact Metro Reconstruction Services, Inc. to take the next step. A careful plan begins with understanding the wall as a whole, and that puts you in a stronger position to protect your home.
Frequently Asked Questions
Will insurance cover my repair?
Insurance coverage depends on what caused the stucco damage and the terms of your policy. Keep dated photographs of the exterior and any interior stains, along with repair reports and other records; these may support a claim. Document where water appeared and what changed before work began. The cause matters: a leak around a window or roof connection may be assessed differently from damage associated with another source.
Can I stay home during repairs?
You can often remain inside during exterior stucco repairs, but access needs depend on the wall location and project size. Work near an entry, window, or frequently used path may affect how you move through the home. Before work begins, identify which doors and rooms need to stay accessible and discuss how the work area will be approached. Extensive repairs may require planning access around several exterior walls.
Must I repaint the whole wall?
No, stucco repair doesn’t always require repainting the entire building. The repaired area’s appearance depends on the existing color, coating age, sun exposure, and patch size. For example, a small patch on a weathered, sun-facing wall may stand out more than one on a less exposed surface. Assess the finish after the stucco dries, then decide whether a localized coating or broader repainting suits the wall better.
What is the Stucco Remediation Process and When is It a Good Idea?
Stucco remediation removes the stucco layers down to the exterior wall’s base layer so concealed damage can be addressed. It’s appropriate when moisture has affected materials behind the finish, rather than just a small surface area. The work then focuses on repairing damaged underlying materials and rebuilding the wall assembly before applying new stucco. Replacing the finish without addressing hidden damage can leave the underlying problem unresolved.
When Should You Remediate?
Remediation is needed when inspection reveals persistent moisture, damaged wall materials, or mold or structural concerns behind the stucco. A surface patch isn’t the right fix for wet or deteriorated backing. For example, recurring interior dampness beside an exterior window can indicate that the problem extends beyond the finish. Expose and assess the affected assembly, repair the underlying damage, and let it dry before rebuilding the stucco surface.
What are the signs of water damage in stucco?
Common warning signs include brown stains, soft spots, swelling, damp areas, cracks, separation, and discoloration. Look for changes in more than one place: a stained interior wall, for example, may coincide with a crack or separation outside. Record each sign’s location and appearance, then check whether it changes after wet weather. A visible crack alone doesn’t show how far moisture may have traveled behind the finish.
What causes water to get behind stucco?
Water can enter around failed flashing, windows, doors, wall openings, roof connections, or worn sealant. Cracks and holes can also develop through settling or impact, creating additional entry paths. Stucco can absorb and hold water, and moisture problems can occur when it lacks a capillary break. Check the transitions between stucco and other building components, since these junctions rely on connected details to direct water away from the wall.
How do you find the source of a stucco water leak?
Start at the interior stain or damp area, then inspect the corresponding exterior wall and nearby transitions. Check above and beside the mark at windows, doors, roof connections, openings, flashing, and sealant. A moisture meter can help assess suspicious wall areas, while small probes can test the wall cavity. Compare and document readings from nearby locations. A dry reading in one spot doesn’t rule out moisture elsewhere in the wall.