
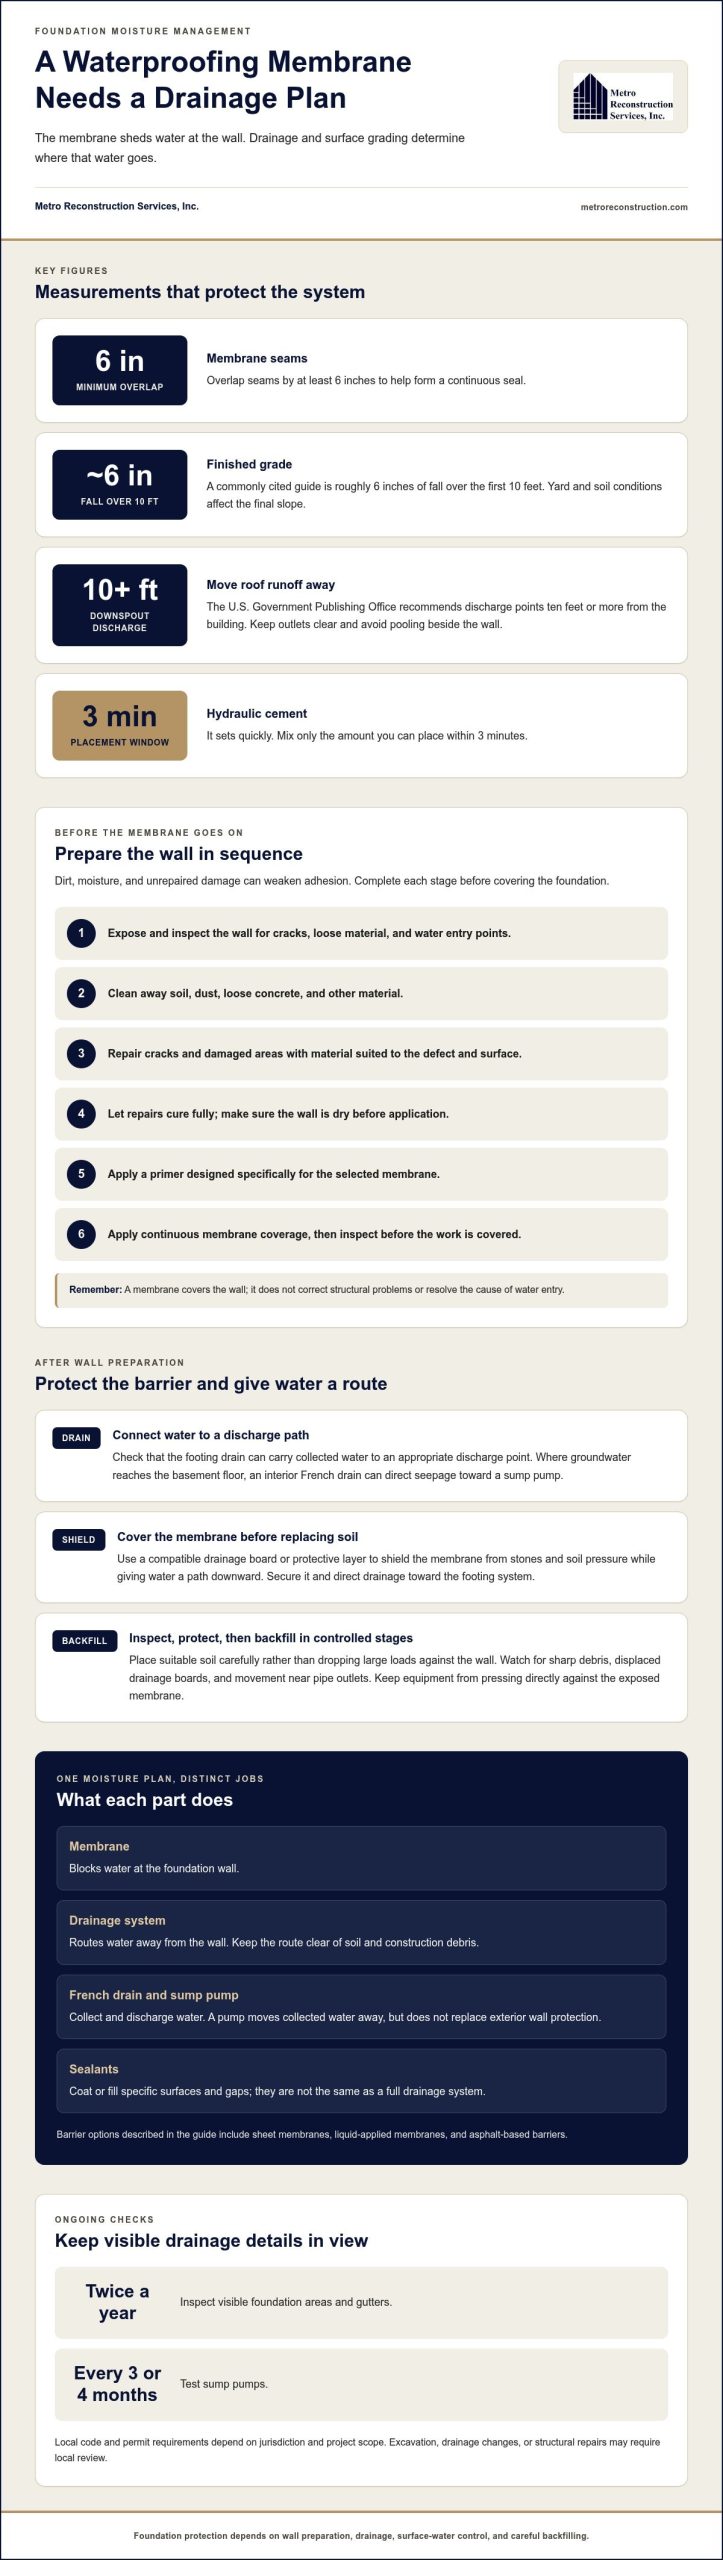
A waterproofing membrane protects a foundation wall when the surface is properly prepared and water has a route away from the home. Basement waterproofing membrane installation involves assessing the wall, addressing damaged areas, and coordinating the barrier with drainage. Membrane seams should overlap by at least 6 inches to help form a continuous seal.
If you’re planning basement waterproofing membrane installation in Boulder, Denver, or another Front Range community, start with the conditions around your foundation rather than choosing a membrane on its own. Soil, groundwater, and surface drainage all affect how water reaches below-grade walls. This guide explains how to prepare the foundation, avoid common installation errors, and decide whether the work suits a DIY project or professional installation. You’ll also see how drainage and backfilling fit into a complete moisture-management plan.
Key Takeaways
- Plan drainage and membrane protection together so soil pressure and trapped water don’t undermine the foundation system.
- Trace moisture to its source before choosing a repair; wall condition and water entry points shape the preparation needed.
- Use careful excavation and backfilling practices to reduce the risk of damaging the membrane after installation.
- Keep surface water moving away from the house, and account for yard and soil conditions when assessing grading and downspout discharge.
- Know when the scope involves more than a straightforward wall application, especially when drainage or foundation conditions are part of the problem.
Foundation drainage and careful backfilling
Connect the wall membrane to drainage, surface-water control, and careful backfilling. The membrane sheds water, while the surrounding system determines where that water goes.
-
Integrate the Drainage System
Plan the drainage route before backfilling. Check that the footing drain can carry collected water to an appropriate discharge point, and keep the route clear of soil and construction debris. Where groundwater reaches the basement floor, an interior French drain can collect seepage and direct it toward a sump pump. A pump moves collected water away, but it doesn’t replace exterior wall protection. If exterior discharge pipes or underground lines suffer from blockages or structural damage, specialists like avdrain.ca offer professional drain cleaning and sewer repairs to keep runoff flowing safely away.
-
Install Protective Drainage Boards
Cover the membrane with a compatible drainage board or protective layer before replacing the soil. This layer shields the membrane from stones and soil pressure while giving water a path downward. Check that the board is secure and drains toward the footing system. Avoid puncturing the membrane with fasteners or letting equipment press directly against its exposed surface.
- Backfill in controlled stages after checking membrane coverage and drainage connections. Place suitable soil carefully instead of dropping large loads against the wall. Watch for sharp debris, displaced drainage boards, or movement near pipe outlets. These can damage the barrier or obstruct water flow once the excavation is closed. Follow the sequence: inspect, protect the membrane, then backfill.
- Shape the finished grade to send rain and snowmelt away from the foundation. A commonly cited grading guide is roughly six inches of fall over the first 10 feet, with yard and soil conditions affecting the final slope. Direct downspouts away from the building; the U.S. Government Publishing Office recommends discharge points ten feet or more away. Keep outlets clear and prevent runoff from pooling beside the wall.
- Choose a barrier suited to the application. Options include sheet membranes, liquid-applied membranes, and asphalt-based barriers. The Centers for Disease Control and Prevention identifies asphalt use in water and moisture barriers above and below ground. A membrane blocks water at the wall, while sealants coat or fill specific surfaces and gaps. Drainage systems route water away; French drains and sump pumps collect and discharge it.
- For projects in the United States, building codes and permit requirements depend on local jurisdiction and the scope of work. Excavation, drainage changes, or structural repairs may require local review, so identify applicable requirements with the building department before work begins. Membrane service life depends on the material, installation, soil exposure, and drainage performance. Inspect visible foundation areas and gutters twice a year, and test sump pumps every three or four months.
Foundation wall preparation and crack repair
Prepare the concrete before covering it. Dirt, moisture, and unrepaired damage can weaken membrane adhesion. For exterior work, the sequence is to expose, clean, repair, dry, prime, and apply the membrane.
- Inspect the exposed wall for cracks, loose material, and damaged areas. Mark defects so they aren’t missed during cleaning. Note where water enters and whether cracks show movement or surface deterioration. A membrane covers the wall, but it doesn’t correct structural problems or fix the cause of water entry; when cracks stem from shifting or settling, structural specialists like Crown Leveling Inc. can assess and level the foundation before moisture barriers are installed.
- Remove soil, dust, loose concrete, and other material from the foundation surface. A clean wall gives the primer and membrane a sound surface to bond with. Pay particular attention to crack edges and rough patches, where debris can remain after a quick rinse. Don’t apply the barrier over a dirty or damp surface.
- Repair cracks and damaged areas before priming. Use a repair material suited to the defect and foundation surface, and follow its preparation instructions. Hydraulic cement sets quickly, so mix only the amount you can place within 3 minutes. Don’t cover an unrepaired crack with membrane and assume the visible opening has been resolved.
- Let the repaired foundation wall cure fully and dry before applying the membrane. Check repair areas and the surrounding concrete, since a dry-looking patch doesn’t mean the entire surface is ready. Applying a membrane to damp or uncured material can interfere with adhesion and leave weak spots beneath the finished layer.
- Apply a primer designed specifically for the selected waterproofing membrane. Follow the product’s directions and cover the prepared surface evenly. Check corners, repaired cracks, and transitions for missed areas. Avoid substituting a general-purpose coating: the primer must match the membrane system so the layers bond as intended.
- For exterior installation, apply the membrane over the prepared, primed wall, maintaining continuous coverage around repaired areas and transitions. For an interior membrane system, attach the membrane to the basement-side wall as part of an interior drainage assembly, directing seepage toward a perimeter channel and sump pump. Interior systems manage water that reaches the wall; they don’t seal the exterior foundation.
- Before covering the work, inspect the wall from top to bottom and confirm the drainage provisions are ready. Exterior preparation requires a clean, cured, dry surface, repaired defects, and compatible primer. Interior systems need a clear route from the membrane to the drainage channel and sump. Keep debris out of the channel so collected water can reach the pump.
Clean the foundation, repair cracks and damaged areas, and ensure it is fully cured and dry before application. Use a primer designed specifically for the waterproofing membrane to support adhesion.
Common installation mistakes
Inspect each layer before covering it. A missed gap or damaged edge can give water a path behind the finished membrane.
- Don’t reduce membrane overlap to save material. Foundation waterproofing membranes should overlap by at least 6 inches to help create a watertight seal. Measure each joint and check that adjacent sheets stay joined across the full seam. A narrow overlap or separated edge can let water pass behind the barrier.
- Keep the membrane continuous at corners instead of treating each wall face separately. At an inside corner, an unsealed fold can channel water behind the membrane. At an outside corner, a tight bend can pull material away from the foundation. Inspect both areas before covering them.
- Seal transitions around pipes and other wall penetrations with compatible detailing. An opening interrupts the flat surface, allowing water to travel around the cut edge. Fit the membrane closely and use the system’s specified sealing method. Don’t leave a visible gap or rely on a loose patch over an irregular opening.
- Use the primer, membrane, and seam materials as a compatible system. Products not designed to work together may fail to bond properly, even when each layer looks intact. Read the selected membrane’s installation instructions first. Check compatibility at seams, corners, and repaired areas instead of assuming similar-looking products can be combined.
- Don’t install over an uneven or contaminated section and expect the membrane to bridge it. A concrete ridge, loose debris, or sharp edge can create a weak point or puncture. Inspect the wall as you work. Stop to correct surface problems rather than hiding them beneath another sheet.
- Protect the finished membrane from tools, fasteners, and excavation equipment. A small cut while adding a drainage layer can become an entry point once soil presses against the wall. Inspect the exposed surface after installing the protective layer. Repair tears with compatible materials before closing the excavation.
- Connect the water-management details instead of finishing the wall alone. Without a clear drainage route, a membrane can leave collected water beside the foundation. Check the lower edge, drainage board, and footing system as one continuous path. Remove obstructions before backfilling. This connection is central to basement waterproofing membrane installation.
- Backfill without striking the protected wall or pressing equipment directly against it. Stones and abrupt loads can shift the drainage layer or damage the membrane underneath. Place soil carefully and watch corners, outlets, and exposed edges. A careful final inspection is part of basement waterproofing membrane installation, catching damage before soil hides it.
DIY versus professional installation
Choose an approach based on access, wall condition, and the work required around the foundation. Exterior membrane work on an existing basement often requires excavation to reach buried walls.
Assess the DIY Option
Assess the site and full work sequence before starting. Consider whether you can expose the foundation wall, work safely around the excavation, and connect the membrane to the drainage route. Account for access near steps, patios, utility lines, and other fixed features. If these conditions restrict access or leave parts of the wall unreachable, the project may be beyond a practical DIY scope.
Consider Professional Installation
Consider professional installation when the work involves extensive excavation, difficult access, or several connected drainage components. A professional can assess how the wall, water-entry points, and discharge route interact, then plan the work around those conditions. This is especially useful when moisture appears in several locations or the foundation has damage that needs assessment before selecting a membrane system.
Review the Project Scope
Review the work plan before deciding who will complete it. It should identify which foundation areas need access, how the membrane connects to drainage, and what must happen before the excavation is closed. For example, a wall partly blocked by a deck needs a different access plan than an open foundation face. A clear scope helps you understand the tasks and decide which work you can manage.
For an existing basement, exterior waterproof membrane installation typically means excavating soil around the home to expose the basement walls. That requirement shapes the decision: before treating the work as a manageable DIY task, consider whether you can handle the excavation as well as the installation. The job isn’t limited to applying material to a visible wall; the buried wall must first be accessible. If excavation falls outside your plans or abilities, professional installation may be more suitable. Include the access work in your decision from the outset, rather than postponing it until after you’ve chosen an approach.
Exterior waterproof membrane installation is often handled by waterproofing professionals because it involves excavation and specialized materials. You should still understand the proposed scope: identify which parts of the basement wall must be exposed and how membrane work fits the project. A clear explanation of the excavation and materials helps you judge whether DIY is realistic or professional installation is the better fit. Focus on the work required for your home, distinguishing between helping with individual tasks and managing the complete installation. The key question is whether your plan accounts for both exposing the existing basement walls and installing the membrane. A decision based on the full scope is less likely to overlook the demands of exterior work.
Managing hydrostatic pressure
Hydrostatic pressure is water in saturated soil pushing against below-grade walls. Soil permeability, groundwater levels, and rain or snowmelt affect water movement, so assess site conditions before choosing membrane and drainage details.
- Trace where water collects around the foundation after rain or snowmelt. Note damp wall areas, seepage at the wall-floor joint, and standing water near downspouts. These patterns can help distinguish surface runoff from groundwater pressure. A membrane can limit water entry through the wall, but it doesn’t remove pressure building outside it.
- Consider the soil directly beside the foundation. Expansive clay swells when wet and shrinks when dry, exerting pressure on foundations. Dense soil can also slow water movement, while more permeable soil may let water reach foundation drains quickly. Record changes in dampness or cracking alongside soil conditions rather than treating every wet wall alike.
- Account for local climate and groundwater movement when planning the system. Rainfall and snowmelt can raise soil moisture, while seasonal groundwater changes can increase water pressure against below-grade walls. For example, seepage after prolonged wet weather suggests a different pattern from a steady leak near a pipe penetration. Match the membrane and drainage approach to the observed source.
- Connect pressure relief to a clear drainage route. Exterior footing drainage can collect water beside the foundation and direct it away from the wall. An interior perimeter channel can collect water that reaches the basement, then route it to a sump pump. Confirm that the discharge path is clear; a blocked outlet leaves water without an effective route away.
- Treat the membrane as part of a pressure-management system, not the only solution. A continuous exterior barrier limits water contact with the foundation wall, while drainage reduces water buildup beside it. Check how the membrane meets the footing drain and wall transitions. Gaps at these connections can let water bypass the protected surface.
- Manage water at the surface as well as below grade. Look for roof runoff discharging beside the house, low spots that hold water, and grading that directs flow toward the wall. Correcting these conditions reduces water entering the soil next to the foundation. For example, a downspout emptying beside a basement corner concentrates runoff there.
- Reassess pressure-related symptoms after drainage and surface-water changes. Compare the same wall locations, joints, and corner areas where seepage appeared. If moisture remains concentrated beside a crack, that points to a local entry path; widespread dampness suggests water may be reaching a larger wall area. If those signs occur with exterior wall damage, contact the team to discuss the building envelope.
Metro Reconstruction Services: Stucco Restoration
Metro Reconstruction Services, Inc. provides Stucco Restoration when exterior finish damage is part of a broader moisture concern. A basement membrane addresses water at the foundation, while stucco restoration repairs damaged exterior stucco; the systems serve different parts of the building envelope. If you see cracking, deterioration, or water-related damage in stucco above grade, addressing the finish can support the exterior wall’s condition alongside appropriate foundation drainage and waterproofing work.
Metro Reconstruction Services, Inc. also provides Masonry Work, Stucco installation, and Stucco replacement. The right scope depends on what is damaged and where moisture is entering, so identify the affected materials before choosing repairs. For help with exterior stucco concerns, contact Metro Reconstruction Services, Inc.
Plan the next step for a drier foundation
Before work begins, turn your observations into a clear project brief: where moisture appears, when it occurs, and which parts of the foundation or exterior are affected. This gives an assessment a useful starting point and keeps the focus on the source of water, not just the visible stain. Basement waterproofing membrane installation depends on that distinction, because the foundation, drainage path, and surrounding exterior all affect how moisture reaches the home.
If you’re ready to move from diagnosis to a repair plan, discuss the foundation conditions and related exterior concerns with Metro Reconstruction Services, Inc. The right next step is a clear conversation about the building’s needs and the work that addresses them. Contact Metro Reconstruction Services, Inc. to take that step with confidence.
Frequently Asked Questions
What is a basement waterproofing membrane and how does it work?
A basement waterproofing membrane is a layer selected to help control moisture at a foundation. Before choosing one, note whether moisture appears as a defined leak, dampness across a broad area, or condensation on a cool wall. For a simple condensation check, tape a one-foot-square piece of foil to the basement wall and leave it for 24 hours. Moisture on the room-facing side points toward indoor condensation.
Can homeowners install a basement waterproofing membrane themselves, or is a contractor recommended?
You can gather useful project information, while a professional assesses the repair scope and system details. Record where dampness appears and whether it changes after rain or snowmelt. Photograph affected areas and note nearby downspouts, wall joints, or visible cracks. These details help clarify the conditions to address before selecting materials or starting work.
What are common basement membrane installation mistakes and risks?
One key risk is treating every damp wall as a membrane failure before distinguishing condensation from water intrusion. Indoor moisture, for example, can collect on a cool foundation surface even when water isn’t entering through the wall. Compare when and where the dampness appears, and use the foil test described above as an initial clue. Misidentifying the source can lead to a repair that doesn’t address the underlying moisture condition.
How much does basement waterproofing membrane installation cost in the United States?
How long do basement waterproofing membranes last, and what maintenance is needed?
Service life depends on the membrane material, installation, soil exposure, and drainage performance. Inspect visible foundation areas twice a year and test the sump pump every three or four months.