
A mountain home’s weak point is often not a single component, but the places where water, snow, and wildfire exposure meet. A home hardening inspection checklist for mountain homes should assess the roof, foundation, exterior connections, and surrounding site as parts of one system. This helps link visible wear to the conditions that may be causing it.
Roof and foundation conditions matter, but steep terrain, freeze-thaw cycles, and remote site features can add concerns that are easy to miss. A professional inspection can identify where moisture collects, whether decks and siding show deterioration, and how prepared the home’s exterior is for wildfire exposure. The goal is to understand what needs attention, not simply list cosmetic fixes.
This article covers roof drainage, foundation movement, wildfire readiness, decks, grading, and rural property considerations such as private wells, septic systems, and access. It also explains how these elements interact, so the findings can guide practical decisions about protecting the home over time.
Key Takeaways
- Assess the roof, gutters, downspouts, and exterior seals together to understand how snowmelt and rain may reach the building envelope.
- Look for foundation cracks, signs of settling, and drainage patterns that could point to water intrusion or shifting.
- Review wildfire exposure around the home and identify exterior features that may need attention, including vents, eaves, siding, and decks.
- Consider how grading, vegetation, and deck connections affect moisture management and the condition of exterior materials.
- Include rural systems and access in the inspection scope, since a visual review alone cannot establish private well or septic system performance.
Roof, siding, windows, doors, and weather sealing
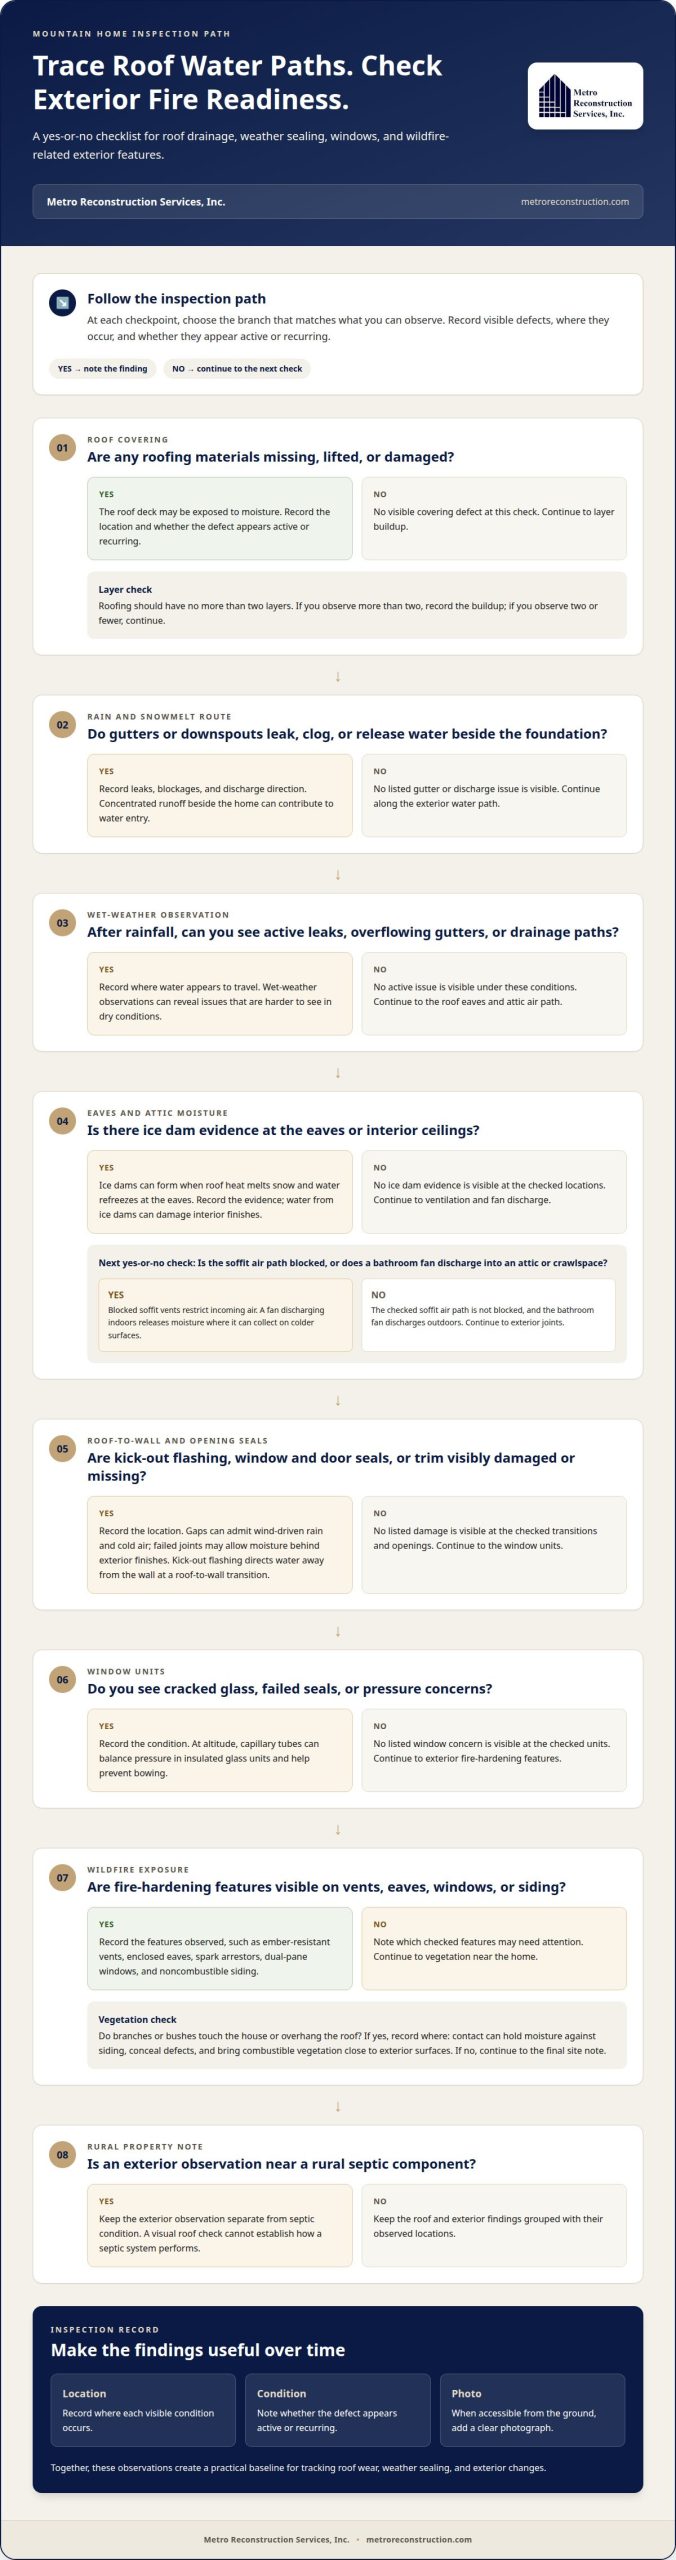
Inspect the roof and exterior as connected parts of the building envelope. In Colorado’s mountain climate, snow, wind, and freeze-thaw cycles can expose weak joints, while roof runoff can affect foundation drainage. A useful checklist records visible defects, where they occur, and whether they appear active or recurring.
- Check the roof covering for damage and layer buildup. Roofing should have no more than two layers, and missing, lifted, or damaged materials can leave the roof deck exposed to moisture.
- Inspect gutters and downspouts for leaks, blockages, and discharge direction. Downspouts should direct water away from the foundation, because concentrated runoff beside the home can contribute to water entry.
- Walk the exterior after rainfall when conditions are safe. Wet-weather observations can reveal active leaks, overflowing gutters, and drainage paths that are harder to see during dry conditions.
- Look for ice dam evidence at roof eaves and interior ceilings. Ice dams can form when roof heat melts snow and the water refreezes at the eaves, allowing water to damage interior finishes.
- Check attic ventilation and the soffit air path. Insulation or debris blocking soffit vents can restrict incoming air and affect how the attic handles moisture and temperature.
- Confirm bathroom fans discharge outdoors. A fan that vents into an attic or crawlspace releases indoor moisture where it can collect on colder surfaces.
- Inspect roof-to-wall transitions for kick-out flashing. This metal flashing directs water away from the wall, helping limit moisture intrusion where a roof edge meets siding.
- Look for gaps around windows and doors, damaged seals, and loose trim. These openings can admit wind-driven rain and cold air, while failed joints may allow moisture behind exterior finishes.
- Review window units for cracked glass, failed seals, or pressure concerns. At altitude, capillary tubes can balance pressure in insulated glass units and help prevent bowing.
- Check siding, eaves, and vents for fire-hardening features. Record features such as ember-resistant vents, enclosed eaves, spark arrestors, dual-pane windows, and noncombustible siding.
- Keep branches and bushes from touching the house or overhanging the roof. Contact can hold moisture against siding, conceal defects, and bring combustible vegetation close to exterior surfaces.
- Note exterior work near rural septic components separately. Keep roof drainage observations distinct from septic condition; a visual roof check cannot establish how a septic system performs.
Record each finding with its location and, when accessible from the ground, a clear photograph. This creates a practical baseline for tracking roof wear, weather sealing, and exterior changes over time.
Foundation supports, anchoring, and signs of shifting
A foundation inspection should connect visible movement with drainage and soil conditions. On sloped Colorado sites, runoff may collect beside one wall while another side remains exposed. Uneven moisture can contribute to changing soil pressure, foundation movement, and water entry. For buyers, findings should identify locations and patterns, not just list cracks.
- Inspect accessible foundation walls for cracks, displacement, and staining. A crack that changes direction, opens across masonry, or accompanies a wall offset deserves closer evaluation because movement may affect more than the surface finish.
- Compare visible conditions across the home’s exterior and interior. A crack near a window or door, paired with sticking operation or uneven trim, can help establish whether movement appears localized or spans multiple areas.
- Review drainage beside uphill and downhill foundation walls. Sloped terrain can direct water toward a structure, so the inspection should note pooling, concentrated runoff, and signs of water intrusion.
- Check whether downspouts discharge away from the foundation. Water released beside a wall can saturate nearby soil and contribute to moisture entry or changing support conditions.
- Look for signs of settlement or shifting at support points. Uneven floors, separated trim, and visible gaps can help explain how movement affects the structure above the foundation.
- Assess exposed wood near basements and crawlspaces. Wood in contact with the ground should be pressure treated, because untreated wood can be vulnerable to moisture-related deterioration.
- Inspect accessible crawlspace areas for moisture and support concerns. Damp conditions, visible growth, or standing water may point to drainage problems that also affect foundation stability.
- Do not enter a confined or unsafe crawlspace to investigate. An inspection should document access limits rather than expose a homeowner to unsafe conditions.
- For manufactured homes, assess foundation supports and anchoring. Look for signs of settling or shifting, since support and anchoring conditions affect the home’s stability.
- Review the manufactured-home frame and undercarriage for visible damage. Corrosion, sagging, or bent beams can indicate structural concerns requiring focused evaluation.
- Consider expansive clay soil where moisture changes are evident. This soil swells when wet and shrinks when dry, exerting pressure on foundations as conditions change.
Record each concern by location and note related observations, such as dampness beside a crack or uneven surfaces above a support. This context helps distinguish surface damage from patterns that may indicate underlying movement. If conditions recur after rainfall or snowmelt, include that timing in the inspection record to help connect water flow with visible foundation changes.
Defensible space and wildfire readiness
Wildfire exposure depends on both the home’s exterior and the fuels around it. A useful assessment considers nearby vegetation, potential ember entry points, and vulnerable materials together, rather than treating each feature separately.
Home-hardening requirements can vary by state, county, and local jurisdiction because adopted codes and wildfire provisions differ. Requirements depend on the property’s location, so the assessment should identify which local rules apply to the project.
Recommended features include ember-resistant vents, enclosed eaves, spark arrestors, dual-pane windows, and noncombustible siding. Material selection should account for the existing exterior assembly, the home’s exposure, and applicable local requirements.
A qualified inspector can assess the home’s exterior, ember entry points, nearby fuels, and visible conditions that may increase exposure. The inspector documents findings by location and explains how each concern relates to the building envelope.
- Review combustible material close to the home. Note vegetation, stored items, and debris beside walls, since nearby fuels can expose siding, windows, and entry points to heat and embers.
- Inspect vents for openings where embers could enter. Record whether vents have ember-resistant protection, because openings connect outside conditions with concealed spaces inside the structure.
- Check eaves and roof edges for enclosed construction. Open eaves can leave vulnerable areas exposed; document gaps and distinguish them from enclosed sections.
- Assess siding material and condition across each elevation. Note combustible cladding, damaged sections, and transitions between materials, since gaps can compromise the continuity of the exterior system.
- Review windows and doors for wildfire-related vulnerabilities. Document glazing type, damaged seals, and gaps around frames, which can create weak points in the home’s protective envelope.
- Record spark arrestors where chimneys or vents are present. Their condition and fit are relevant to the inspection because sparks can threaten combustible material nearby.
- Check decks where they meet the house. Document combustible surfaces, debris accumulation, and concealed spaces beneath the deck, since these can connect exterior fuels to the structure.
- Map vegetation and fuel conditions around the property. An inspector records slope, access, and nearby fuels, then relates those observations to the home’s exposure rather than assuming every parcel has identical conditions.
- Separate visible findings from conditions that need further investigation. A photograph of a vent or eave records its appearance, but does not establish concealed assembly details.
For a property-specific review, fire-mitigation inspection and prevention work can connect exterior vulnerabilities with practical hardening priorities. A written record of observed features, affected locations, and recommended next steps gives you a clearer basis for planning improvements and tracking completed work.
Exterior siding, decks, and grading
Inspect siding, decks, and site drainage as connected parts of the exterior system. On sloped Colorado terrain, runoff can collect beside a wall, while deck joints and cladding gaps may leave vulnerable areas exposed. A useful record links each condition to its location, nearby ground slope, and signs of moisture or deterioration.
- Check whether the ground slopes away from the house. A reverse slope can direct rain or snowmelt toward the foundation, where water may pool or enter through vulnerable areas.
- Inspect grading along uphill and downhill sides. Record low spots, channels, and areas where runoff changes direction, since steep terrain can send water toward the building.
- Measure the visible clearance below wood siding. Wood siding should have at least 6 inches of clearance from the ground, helping limit direct contact with soil and moisture.
- Note the gap between soil and the first wood component. Maintain at least eight inches between soil and the first wood on a home to reduce termite risk.
- Look for siding cracks, loose sections, and open joints. These defects can admit water behind the exterior finish, where hidden moisture may affect sheathing before interior damage appears.
- Review deck boards, stairs, railings, and support connections. Soft or damaged wood, loose connections, and debris trapped between boards can indicate deterioration or create areas where embers may collect.
- Inspect where decks, fences, and other attachments meet the house. A professional ember-exposure review documents combustible materials, gaps, debris, and attachment points that connect exterior features to the building.
- Check vegetation and stored materials beside siding and decks. Branches and bushes should not touch the house or overhang its roof, because contact can hold moisture and conceal defects.
- Review grading after rainfall when conditions allow. Water paths, pooling, and damp soil can show how the site drains around the home more clearly than a dry-weather view.
For real estate decisions, these observations help distinguish a surface maintenance issue from a condition involving drainage, attachment, or concealed moisture. Photographs should show the affected area in relation to the ground, deck, or adjoining wall. That context helps reveal whether a defect is isolated or occurs alongside broader site conditions.
When a deck shows structural damage, an evaluation should consider its supports and connections, not just the walking surface. Replacing siding without addressing water paths can also leave the original moisture source in place. A coordinated inspection records both the exterior material and the grading around it.
Mountain and rural home inspection considerations
A mountain property assessment should include the home, surrounding ground, and systems beyond the exterior walls. Steep slopes, snowmelt, limited access, private wells, and septic systems are conditions a basic visual review cannot fully assess.
Prioritize repairs by immediate exposure and potential consequences, not appearance alone. Address active water entry, unstable supports, damaged exterior protections, and ember-entry points before less consequential surface defects.
- Inspect crawl spaces for moisture, ventilation, and pest activity. Damp soil, poor airflow, or pest signs can affect concealed framing and support conditions; unsafe or confined areas should not be entered during a visual review.
- Check log-home chinking for cracks, tears, or lost adhesion. Open joints can admit water and cold air, while upward-facing checks in logs may collect water and contribute to deterioration.
- Assess log corners for softness that may indicate rot. Soft material at a corner can signal moisture damage in a structural connection, so record its location and nearby water paths.
- Review skirting and under-home vapor barriers for gaps or damage. Openings can expose the area beneath a home to weather and pests, while damaged barriers may allow ground moisture to collect.
- For manufactured homes, inspect the undercarriage and supports. Corrosion, sagging, bent beams, or shifting supports can affect stability and warrant focused evaluation.
- Observe where melting snow drains beneath or beside the home. Diverting meltwater away from manufactured homes can reduce water accumulation during freeze-thaw cycles.
- Treat private well and septic systems as separate inspection needs. A quick visual check cannot establish water quality or system performance; septic evaluation should cover the tank, distribution box, and drain field.
- Include private well flow and recovery in rural property planning. These measures help assess whether the well can meet normal household demand, while water testing can examine bacteria, nitrates, pH, hardness, and locally relevant contaminants.
- Review septic service records and capacity information. System age, design capacity relative to bedroom count, and recent pumping or service history help clarify its condition and suitability.
- Assess access routes and property documentation. Determine who maintains private roads, review written maintenance agreements, and examine easements, boundaries, deed restrictions, and protective covenants.
For buyers, these checks help separate visible building conditions from land, access, and utility questions that need dedicated evaluation. Keep inspection records, service history, and available system documents together. This context links findings on the ground with the home’s drainage, access, and operating systems.
Metro Reconstruction Services: Fire Mitigation Inspections & Evaluations
Metro Reconstruction Services provides Fire Mitigation Inspections & Evaluations for homeowners assessing wildfire exposure and exterior vulnerabilities. Use this service when findings point to concerns involving ember entry, siding, stucco, masonry, or other parts of the home’s exterior. Home Hardening Services can address broader protection needs, while Stucco Restoration and Masonry Work focus on those materials when they need attention.
A focused evaluation connects observed conditions with potential next steps instead of treating each exterior feature as an isolated issue. Share any available photos, previous inspection notes, or records of completed work to provide useful context.
To discuss your property’s inspection needs, contact Metro Reconstruction Services or call 303.543.9549.
Turn Inspection Findings Into a Durable Plan
The most useful next step is to turn observations into a clear sequence of work. Separate urgent conditions from planned upgrades, and keep photographs and inspection notes together so each decision reflects the home’s actual condition. A home hardening inspection checklist for mountain homes can support that process, but lasting results depend on addressing underlying causes rather than masking visible damage.
Metro Reconstruction Services can help you consider how exterior materials and structural conditions fit into a property-wide plan. Its services include stucco installation to support durable exterior improvements where appropriate. The right scope depends on the findings and how each part of the home connects to the others.
For a conversation about your inspection findings and possible next steps, contact Metro Reconstruction Services or call 303.543.9549. With a clear assessment and a measured plan, you can move forward with greater confidence in your home’s long-term protection.
Frequently Asked Questions
What does a home hardening inspection checklist for mountain homes include?
It should define the inspection’s scope, record what was accessible, and separate observed conditions from items needing further evaluation. Ask for findings organized by location, with photographs that show context and close detail. A useful report also notes relevant maintenance or repair records you provide, so a reviewer can distinguish a new concern from a recurring one and identify practical follow-up.
How should inspectors assess roofs, gutters, vents, and eaves for wildfire risk?
The report should link each observation to its location and state whether the feature was visible or concealed. For example, a photo can document an exterior vent, while a safely accessible attic view may clarify nearby construction. Inspectors should also note any previous alterations or repair records you provide, which can help explain differences between visible components and the surrounding assembly.
What defensible-space zones and vegetation clearance are recommended around mountain homes?
Use a property-specific plan rather than assuming one clearance distance fits every mountain parcel. A practical assessment can group observations by proximity to the structure and note where steep terrain, property boundaries, or access limitations affect treatment. This makes recommendations easier to coordinate with the site. Keep the resulting map or written plan with property records so future maintenance can follow the same priorities.
What are the main wildfire home-hardening standards and inspection programs in the United States?
Do not assume that one national inspection program governs every home. For useful documentation, ask the report to identify the code or program criteria it applies and distinguish mandatory requirements from voluntary recommendations. The International Residential Code (IRC) is a relevant model-code reference, but the applicable provisions depend on the jurisdiction. Naming the criteria in the report makes later project planning clearer.
What winter weather, snow-load, wind, and freeze-thaw risks should a mountain-home inspection cover?
Beyond visible damage, record when a concern appears and whether it changes with the seasons. For example, note new interior staining after a thaw or a change in a previously documented exterior joint. A visual checklist cannot establish structural capacity for snow loads; signs of deformation call for a focused structural evaluation. Comparing dated inspection records can reveal changes a single visit may not show.
What home-hardening repairs should be prioritized to reduce risk?
Prioritize active water risks: repair roof damage or leaks, clear and fix gutters, direct downspouts away from the foundation, and correct grading that sends water toward the home. For wildfire exposure, address ember entry points and vulnerable exterior features, including vents, open eaves, and combustible siding.